

How To Create Buttons In Gimp
![]()
AfterDawn Blu-ray Encoding Tutorial Lesson 10
Make Menu Buttons With GIMP
In Lesson 9 of our Blu-ray Encoding Tutorial you learned how to create backgrounds for still menus from your video files. In Lesson 10 you will learn how to use the free image editing program GIMP to produce image files to represent the three standard states defined in the Blu-ray standard for all buttons.
Preparing For This Lesson
Before you attempt to follow the steps in this lesson you should make sure to familiarize yourself with at least lessons 1, 2, and 4 which cover the process of loading sources, creating AviSynth scripts, and using the x264 video encoder. The steps outlined below build on the steps in those lessons. If you don't feel comfortable with those steps in the process, you may want to re-read them now, or at least be prepared to review them as you follow along with this lesson.
The Complete AfterDawn Blu-ray Encoding Tutorial
Creating assets for Blu-ray authoring is relatively easy, but not necessarily simple. To make it easier to learn we have divided this tutorial into several individual lessons, each of which addresses a single step in the process. At the top and bottom of each lesson is a navigation menu where you can jump to any other lesson in the series. You can easily return to a previous section for review or skip over any future section. It is recommended that you read the entire series at least the first time through.
-
Lesson 1 - Prepare Source Video
- In the first lesson you will learn how to analyze your source video, ensuring AviSynth will be able to decode it properly, and also formulate a plan for making any changes which may be required. In most cases this will also involve creating an index, which is a sort of map to the contents of a video.
-
Lesson 2 - Create AviSynth Script
- In the second lesson you will learn to use MeGUI's AVS Script Creator tool to provide instructions for loading your source video and performing any required processing. This may include resizing video to the desired resolution and either deinterlacing or bobbing interlaced video to make it progressive.
-
Lesson 3 - Create Chapter File and Calculate Bitrate
- In lesson three you wil learn how to create a file specifying chapter points and calculate the correct bitrate for your encoded video.
-
Lesson 4 - Encode Video
- In lesson four you will learn about the proper settings for encoding your video.
-
Lesson 5 - Encode AC-3 Audio
- In lesson five you will learn how to encode your audio to AC-3 format using MeGUI and either the Aften encoder or FFmpeg. When you complete this step you will have Blu-ray compliant audio files.
-
Lesson 6 - Advanced Bitrate Calculation
- In lesson six you will learn more advanced techniques for calculating bitrate when you are authoring a Blu-ray disc from multiple video files.
-
Lesson 7 - Advanced Audio Processing
- In this lesson you will learn how to use Audacity to combine individual audio files to produce either an uncompressed (LPCM) or Dolby Digital (AC-3) audio stream
-
Lesson 8 - Convert Text Subtitles To Images
- In Lesson 9 you will become familiar with the process of converting subitles from the text-based SRT, SSA, and ASS formats to Blu-ray compliant SUP or BDN XML format.
-
Lesson 9 - Prepare A Still Menu Background
- After completing Lesson 10 you should be able to create a single frame video file for use as the background for a Blu-ray still menu. You will also be able to extract a video frame as a regular still image file (such as a PNG or JPEG) and how to convert those common files into single frame, Blu-ray compliant video streams.
-
Lesson 10 - Make Menu Buttons With GIMP
- This lesson will teach you the basics of making your own buttons for Blu-ray menus using the free image editor GIMP. It also includes tips on how to add elements necessary for a functional Blu-ray menu to a still image and assemble a mockup so you know what your menu will look like before you start the authoring process.
Official AfterDawn Blu-ray Encoding Tutorial feedback thread
We have created a dedicated discussion in our forums (open in new window) for feedback on this tutorial. We would love to hear your whatever thoughts you have. Tell us what you liked or what you didn't like. Let us know if there was something you didn't understand or even something that was just plain wrong. We strive for 100 percent accuracy in our guides, but nobody's perfect. Any help you can give us in getting a little closer to that goal is appreciated. Our goal is to help you out, and anything we can change to do a better job of that is an improvement.
Lesson 10 Objectives
- Learn about the difference between buttons and the image files which represent them on Blu-ray menus
- Become familiar with the 3 states for buttons and understand why they are important
- Learn to create images for menu buttons using nothing but text
- Begin familiarizing yourself with GIMP's toolkit by making simple still Blu-ray menus
- Expand your use ot GIMP by using it to create a still menu background and a mockup of the same including menu buttons.
Actually Buttons Are Not Images & Images Are Not Buttons
Most people could probably tell you what a Blu-ray (or DVD) menu button is. It's as plain as day right there on the TV. You pres the arrow key on your remote and it lights up or changes color, or maybe there's suddenly a border around it or line underneath it. Whatever it looks like, almost anyone could tell you that's a button. And for all practical purposes that's close enough if all you are doing is watching discs.
It's also wrong and that's something you should understand if you are serious about authoring discs of your own. At least if that happens to include any in-depth menu work. A button is really little more than an abstraction. The defining characteristic that label is based on, being associated with a selectable area of the screen, may not even have anything to do with what it actually does. In fact it could be invisible and have no way for you to access and activate it via your remote and yet still be a button.
Then again, perhaps you don't really care about the distinction or find it of any importance. It might even have occured to you that the title of this lesson does, in fact, equate the two. And in fact that's part of the reason for pointing this out.
No matter how well you design the images you assign to a menu button, they will not improve its functionality one bit because that's not what they are for. The images you will be reading about are not for the disc or the player. They're for whoever is on the other side of the remote control and when you are working on them that's who you should have in mind.
The Three States
Every button in a menu is always in one of three states. Those states typically define how (and if) they react to user input. Each one is also commonly associated a different image which hopefully makes the button's present state clear. The states are as follows:
-
1. Normal
- This is the default state for most buttons. It means the button does not have focus. If you press the Enter or OK button on your Blu-ray remote it should not trigger a reaction from button in this state.
-
2. Selected
- This is the state for the button which does have focus. Normally if you press the Enter button on your remote this button will respond.
-
3. Activated
- An activated button has already responded to some kind of input, typically from the viewer's remote.
The reasons for choosing these particular states should be obvious. They represent the information you, as the creator of a Blu-ray disc, should assume a viewer wants to know at all times. Your primary objective, regardless of any other considerations, should always be to communicate which state every button on a menu is in.
Toward that end each of them is typically associated with a different image. In other words when you are creating images for a button you normally make not just one, but three. Additionally it's important that the images assigned to every button on a menu communicate that information in a uniform way. Perhaps the selected button has a line under it or a circle around it. Or maybe all the buttons in a normal state somehow fade into the background more. The possibilities are really limited only by your imagination, and perhaps your skill with graphics software.
The Power Of Illusion
A Blu-ray menu doesn't have to be a work of art, which is fortunate since they usually aren't. On the other hand there's nothing stopping you from making menu design into a creative process. Even before the introduction of Blu-ray, when disc authors were limited to the significantly more limited technology of DVD, there were some truly imaginitive things done with menus. And even if you can't (or don't want to) make your disc a masterpiece, you should at least be able to make it aesthetically pleasing.
Required Software
There are many programs capable of creating images perfectly suitable for making Blu-ray menus. This lesson will make use of one of the more powerful free options available, a program called GIMP.
 | GIMP |
The Basic GIMP Interface
GIMP's interface is a lot difference than most other programs. It actually consists of three different windows, each of which serves a different purpose. Before you get started making buttons with GIMP, you shold familiarize yourself a little with each of these windows because you will be working in all of them at various times.
Image Window
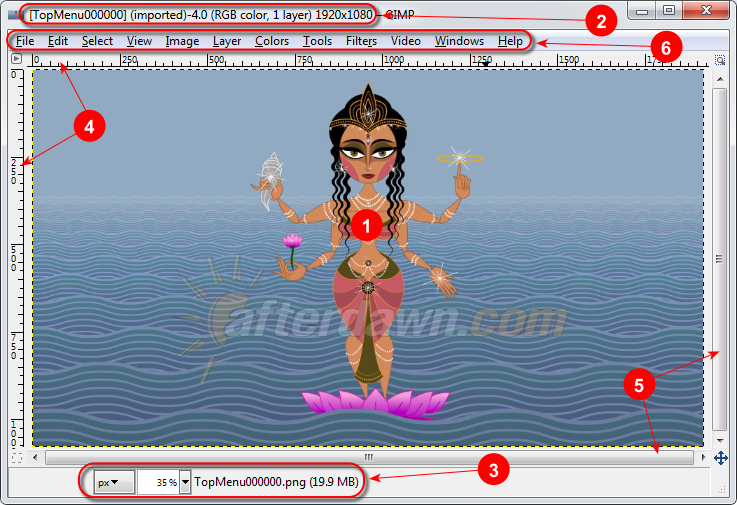
The primary window in GIMP is the Image Window. As the name suggests, this window is where your image is displayed and where you can interact with it in various ways. Unlike the other windows you will learn about in a minute, each image you open or create has its own Image Window.
-
1. Image
- In the center of this window is, obviously, the image itself.
-
2. Titlebar File Details
- On the Titlebar of each Image Window you will see a number of details about the image including the name (filename without an extension), whether it came from opening an existing file (imported), the color mode (RGB, Grayscale, or Indexed), how many layers the image has, and what the resolution is. In this case we can see that the filename is TopMenu00000, it was opened or pasted into GIMP (imported), it is in color (RGB), has just a single layer, and a resolution of 1920�1080.
-
3. Zoom & Filename
- On the left of this area is the Zoom setting, telling you whether the image is scaled either up or down and what units are used for the rulers on the side and top of the image. On the right the name of the file this image came from or was last saved to is shown. Unlike the name listed above, this includes the file extension. You should be able to determine from this what format it's saved in.
-
4. Rulers
- These rulers provide a reference for the horizontal and vertical size of the image, and also how far from the origin (top, left corner of the image) any given point is. A triangular pointer on each ruler indicates the current location of the mouse pointer.
-
5. Navigation Sliders
- When an Image Window does not have room to display an image in its entirety these slider bars can be used to shift the focus so different portions are visible.
-
6. Menus
- On one hand these menus work similarly to the standard you're probably used to for Windows. There are common menus like File, Edit, and View, and some less common menus like Layer and Filter. What's somewhat unique is that you can also access the entire menu system by right-clicking anywhere on the image or the Layers Window or by selecting a button from the Toolbox Window.
Docks
There are two docks, one on each side of the Image Window. By default they are separate windows. On the left is the Toolbox dock which also contains the Tool Options dockable dialog. On the right is a second dock which contains the Layers and Brushes dockable dialogs. Since this is not a general GIMP tutorial, it would be counter-productive to go into great detail about all the tools and options on these docks. Instead we will look at them only as they become necessary for the lesson.
Single Window Interface
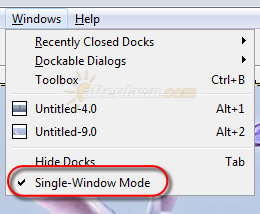
To make things simpler, and to make GIMP more comfortable for people who are used to the standard, single window model for Windows programs, this lesson assumes you will be using it in Single Window Mode. This simply means GIMP's docks are included as part of the main window, but still on the sides, while images are loaded into separate tabs instead of multiple Image Windows.
Putting GIMP In Single Window Mode
To put GIMP into Single Window Mode you simply need to select it from the Window menu.
Now you should be ready to start making Blu-ray menu buttons with GIMP. Keep in mind that the examples which follow are only a very small subset of what's possible and don't even begin to address all the available menu design options. Rather, they are intended to be used for creating buttons for some of the most basic and obvious scenarios.
Image Characteristics
Blu-ray Interactive Graphics (IG) streams, which is where your button images should end up, are indexed bitmaps. That means they are encoded in 32-bit ARGB (8-bits each for Red, Green, Blue, and transparency channels) but only 255 unique colors may be used for a single image. The selection of colors in a particular image file is known as its palette. On occasion this 255 color limit can be limiting from a creative standpoint but certainly not always.
Example 1 - Simple Text Buttons
The first example we will be looking at is a set of simple text-based buttons.
Step 1 - Create A New Image

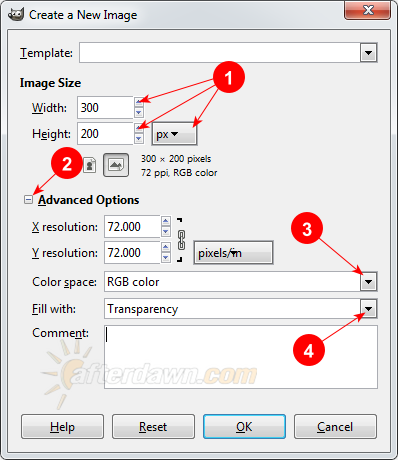
Create a new image by selecting New from the File menu.
-
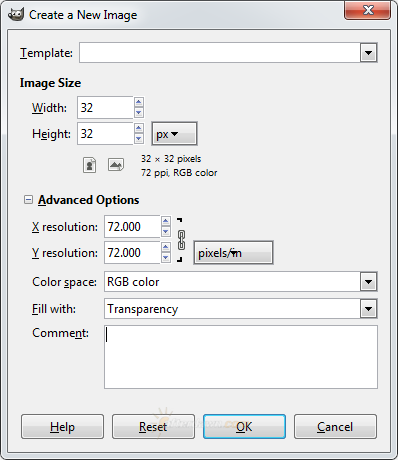
1. Image Size
- Here you can set the resolution for your new image. You can start with it set to a generous size the first time around. As an example I'm using 300�200. Also make sure the units are set to pixels rather than something less specific like inches or millimeters. All you care about here is pixels.
-
2. Advanced Options
- Click here to set some Advanced Options.
-
3. Color space
- Set this to RGB color. Although what we really want is indexed RGB, that isn't an option during image creation. The only options at this point are color (RGB) or black and white (Grayscale).
-
4. Fill with
- Make sure Fill with is set to transparency. This actually accomplishes two things. The first is ensuring your image has a transparency channel, potentially saving a step later. Additionally it ensures any areas you choose not to use for elements of your button are not visible and do not obstruct the menu background.
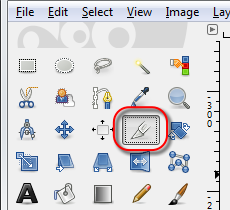
Step 2 - Add Button Text
Next you will use the text tool to create the basic text for your button. This will be what you would see when the button is loaded (visible) but not selected or activated.
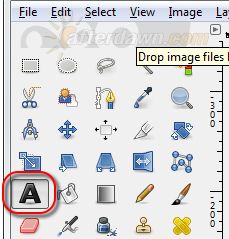
Click on the Text Tool icon in the Toolbox to activate it.
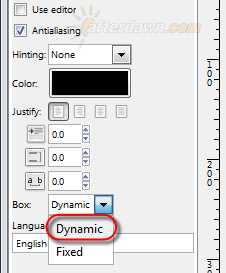
Select Dynamic for the box type to make the text box grow horizontally as you type and vertically when you press the Enter key.
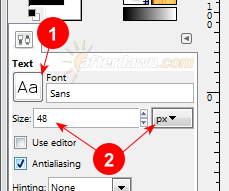
Select Font
-
1. Font Face
- If the Font isn't already set to Sans, click this button and select it from the list. Make sure you choose the regular font without any bolding or italics.
-
2. Font Size
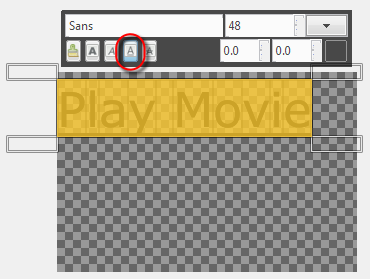
- Set the font size to 48 and make sure the units are set to pixels (px).
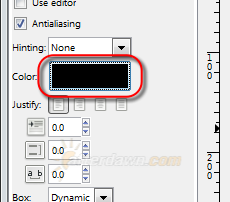
If the color isn't already set to pure black, click on this area to open the Text Color dialog.
-
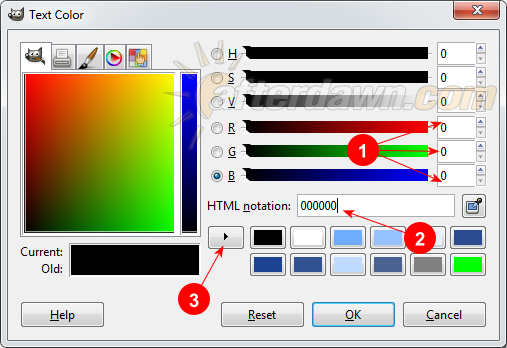
1. Adjusting RGB Values
- One way to set the text color is by directly adjusting the Red, Green, and Blur (RGB) values. For Black you should either enter 0 in the text box next to each or drag the sliders all to the far left.
-
2. Enter RGB Values
- If you happen to know the hexadecimal values for Red, Green, and Blue you could enter them in order here. For black this is easy since they are all 0 (ie 000000).
-
3. Save Colors As Presets
- Once you have your color selected using either of the methods described above you can create a preset using this button so it's easier to reuse a particular color. When you want to reload a color you just have to enter this dialog and click on it iat the bottom.

Click on the left side of the blank image to begin text entry. Type 'Play Movie'.
Step 3 - Create "Selected" Text
Now you need a copy of the button text which has been altered in some way to indicate it has been selected. One simple way to do that is just making the text underlined.

-
1. Open Layer Context Menu
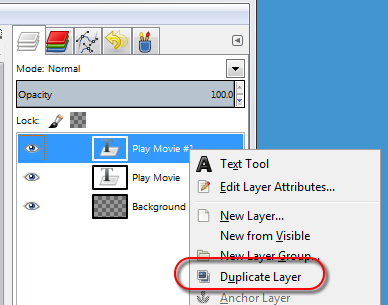
- Find the text layer you just created (the name will match the text) and right-click on it to open a context menu.
-
2. Duplicate Layer
- Select Duplicate Layer and a second text layer will appear which is identical to the original in every way except that the name has '#1' added to the end.
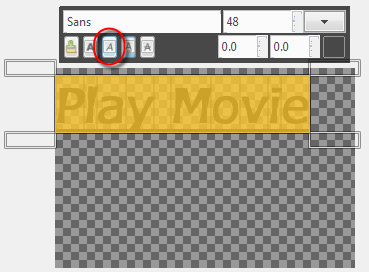
Drag across the text to select all of it and click the Underline button.
Step 4 - Create "Activated" Text
We have two different versions of the text so far. The undecorated version is how it will appear when not selected. The underlined variant can be used to indicate the button has been selected. That obviously leaves the question of how to show the button has been activated. For that we'll make a copy of our new underlined text and make it italic.
Once again you will right-click on the layer you want to duplicate (the new one with the underlined text this time) and select Duplicate Layer.
Just like last time you will also select the text on the new layer, but this time you will click the Italics button.
Step 4 - Save As GIMP (XCF) File
Now, between the three text layers you have created, you have everything you will need to make your button files. But before you do that you should save the entire thing in GIMP's internal format. When you save in any other format the text layers turn into regular graphic layers, meaning they can't be edited (as text). By saving in GIMP's own format you can preserve them as text in case you want to change them later.
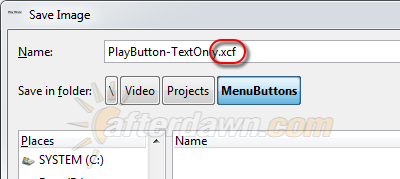
Select Save as from the File menu and the save dialog will appear. Browse to the desired folder and give your file a name. Make sure to add a file extention of '.xcf' to save in GIMP's native format.
Step 5 - Crop Your Buttons
You're almost ready to save your individual buttons, but before you can do that you need to eliminate all the unused area in the image. You will use GIMP's Crop Tool for the job.
Select the Crop Tool from the Toolbox.
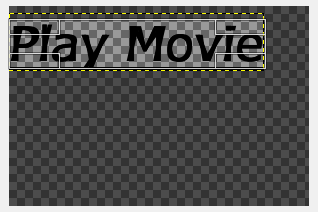
Drag the mouse pointer to select just the part of the image with text. Press the Enter key on your keyboard to crop the image. You will be left with three layers of text, all visible simultaneously, with the second covering the first and the third covering the second.
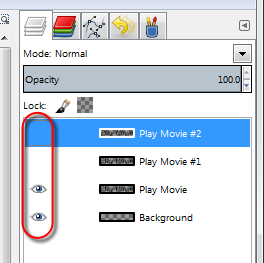
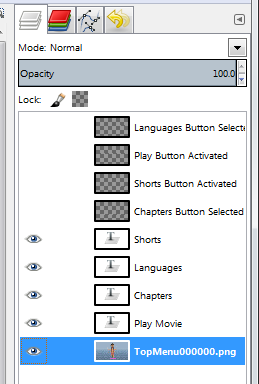
Visible layers are indicated by an eye next to the layer name. In order to save an image with just one version of your text button visible you will need to hide the other two. Click the eye icon next to the layers you want to hide. When it disappears, the layer will disappear from your image.
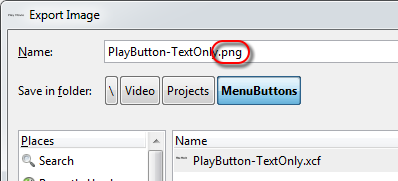
Now you can save the image without the two extra layers using the Export option from the File menu. Make sure to set the file extension appropriately for the type of file you want to end up with. The most common will be PNG (compressed bitmap), but you could conceivably use regular bitmap files (.bmp extension), JPEG files (.jpg or .jpeg), or even less common formats like TIFF (.tif).
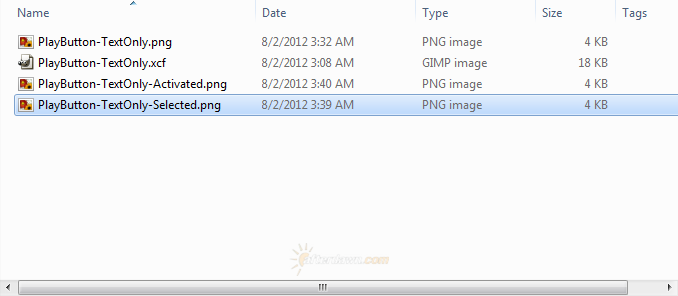
Once your first file is saved you can return to the main GIMP interface and change which layer is visible to save the next one (under a different name of course). Repeat for both each additional layer. When you are finished you should have something similar to this.
Example 2 - A Basic Image Button
Sometimes buttons do not need to have any text at all. Sometimes the text is actually part of the background (video) and the actual button is just a picture positioned next to the text to show which option is selected. That's the scenario this next example is designed for.
Step 1 - Create A New Image
This is essentially identical to the first step of the first example except this time you will be creating a new image exactly the size of your button. The dimensions will be 32 pixels � 32 pixels.
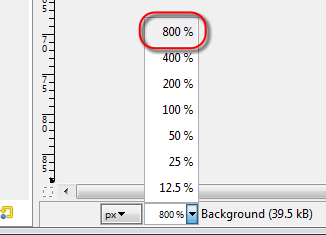
Zoom To 800 Percent
Use the selection list at the bottom of the window to increase the zoom to 800% so you can see all the details of the button as you work on it.
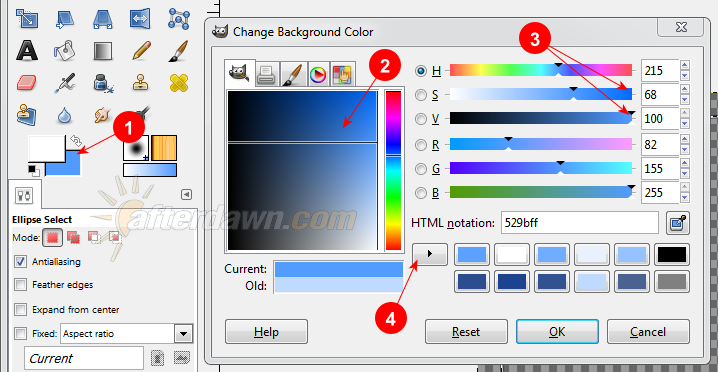
Step 2 - Set Background & Foreground Colors
In order to produce a crude 3D effect for your button you will be using something called a gradient. In essence this means the color will gradually change from one color to another across the area of your circle. But before you can do that you need to select colors to use to define the color range.
-
1. Foreground & Background Colors
- In this area you can see the currently selected background color. Click on it and the Change Background Color dialog will appear. This dialog is essentially the same as the Text Color dialog from the first example.
-
2. Graphical Color Selection
- Instead of adjusting the Red, Green, and Blue levels directly, you may find it more useful to begin by simply clicking on the color your want, or at least something close to it.
-
3. HSV Adjustments
- The S and V values at the top are particularly helpful if you just want a lighter or darker version of the currently selected color.
-
4. Save Color
- Once you find the color you want to use, don't forget to save it using this button. Of course you can also just copy the hex value for the shade of blue shown here (5ba0fe) into the HTML Notation field instead of picking the color for yourself.
Next you will need to set the foreground color to a light blue. This works exactly the same, except of course that you need to select the foreground color from the Toolbox first. I'm using a color which corresponds to the HTML Equivalent of bfdaff.
Step 3 - Select A Circle
This time around you are going to start by designing the button as it will appear when selected. You will start with a simple circle filled with one solid color. It will require first selecting a circular area with the Ellipse Select tool and then using the Bucket Fill tool to fill it in.
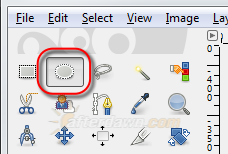
Activate Ellipse Select Tool
Since your button is going to be circular, you will need to use the Ellipse tool to create the basic shape. Once this tool is selected, click on the top left corner of the image and hold down your mouse button while dragging all the way to the opposite (bottom right) corner. This will form a perfect circle. You can verify that your selection is exactly right by looking at the Tool Options dock underneath the Toolbox.
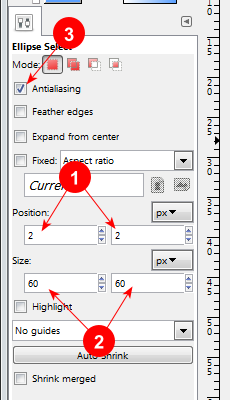
Adjust Ellipse Select Tool Options
-
1. Left & Top Position
- These fields determine how close the ellipse gets to the left and top sides of the image. Make sure both numbers are 0. You can edit them directly.
-
2. Width & Height
- Both the width and height of the selection should be 32 so your circle reaches all the way from edge to edge.
-
3. Antialiasing
- Whenever you are selecting any area which has a curved perimeter you should make sure Antialiasing is selected. In this case it will only be of limited use because the button is so small. Even so, it's best to enable it on general principal.
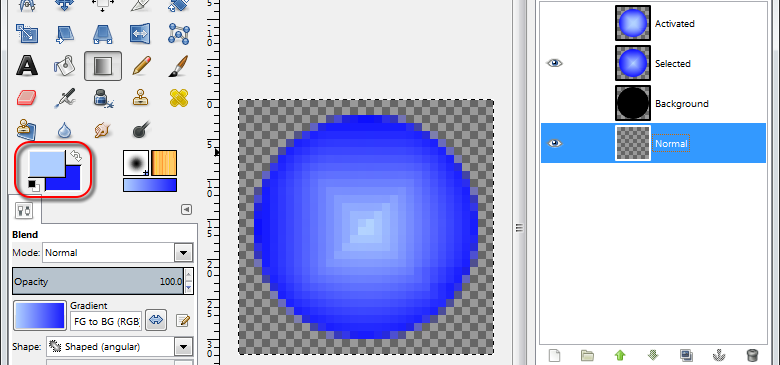
Step 4 - Fill Circle With Gradient
You could fill the surface of your button with a solid color, but this has two problems. The most obvious is that a plain, flat disc just doesn't look that good. But actually there's another reason which is perhaps more important. Because of the small size, your circle will end up being more like a square which is tipped up on one corner. The sides will be almost entirely flat. By using a gradient you can create the illusion of a spherical surface. This, in turn, will fool the eye into believing the perimeter is rounder than it is. Your brain will generally ignore the straight sides because it assumes the shape matches the illusion created by the surface coloring.
-
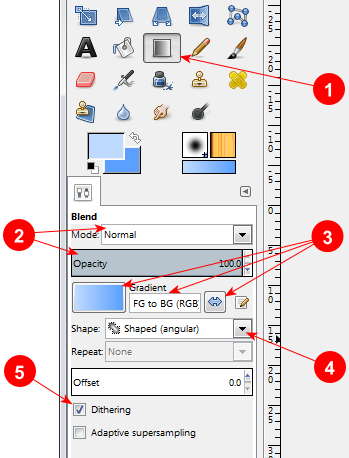
1. Blend Tool Button
- Use this button to activate the Blend Tool
-
2. Paint Mode & Opacity
- Set Mode to Normal so whatever pixels are filled will cover up anything underneath them and Opacity to 100% which is equivalent to 0% transparency.
-
3. Gradient
- These settings determine how the color of each pixel in the gradient will be determined. On the left side is a representation of which color will be used for the first point (whichever is shown on the left side) and which will be the second. The foreground (lighter) color should be on the left. If it isn't you can click the double-ended arrow on the right side to flip it around. In the middle is the name of the formula which will be used to calculate the color of each pixel. It should say FG to BG (RGB). If it doesn't you can select that option by clicking on the gradient representation on the left.
-
4. Shape
- Because your button is a circle you will want to use a shape which gives the illusion of a domed shape. Select Shaped (angular) here.
-
5. Dithering
- As a rule you should always have dithering turned on unless you have a specific reason not to. Dithering is a strategy for coloring pixels of very small images (like this one) to give the impression of higher resolution, finer detail, and more colors. As you will see when you actually begin exporting your button it won't really help in this case due to the limited palette (256 colors) available for Blu-ray subpictures.
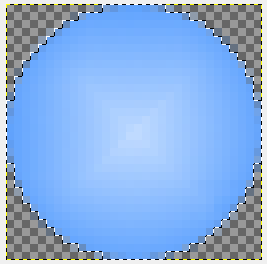
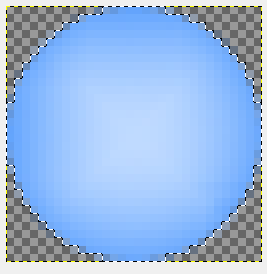
Once you have the Blend Tool options set properly you can draw your gradient by clicking on any point in the selected circular area and dragging to any other point. The result should look something like this.
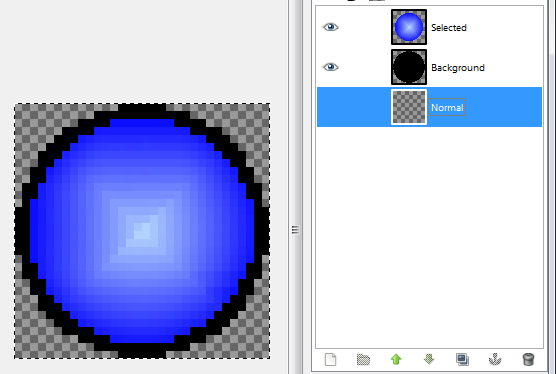
Step 5 - Duplicate Layer For 'Selected' Button
Even though you have one step left before this button is finished, at this point you will want to make a copy of this layer to use for the button in a selected state. Copying an image layer works just like copying a text layer like you did for the previous set of button images. Right-click on the name in the Layers dock (on the right side of the window) and select Duplicate Layer from the context menu.
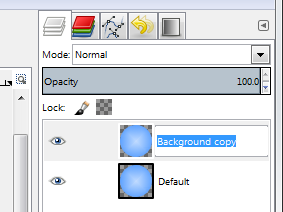
Next you can double-click on the name of the bottom layer to rename it. Simply type the word Default in and press the Enter key on your keyboard. Don't forget the Enter key or else your changes will be discarded. Next rename the copy Selected.
Step 6 - Dim The Default Layer
It's important that you can tell when a button is selected. Since the gradient effect makes it appear like the center is lit up, you can simply lower the brightness and contrast of the unselected version.
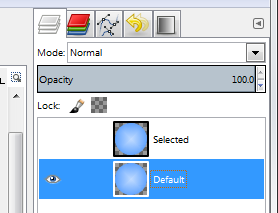
Since you need to see what the bottom layer looks like you will first need to make the copy (top layer) disappear. As with the text layers you simply need to click on the eye icon next to the layer you want to make invisible and it will disappear. Next make sure to click on the Default layer. Any changes you make will be applied to whichever layer is selected in the Layers dock, even if it is not visible.
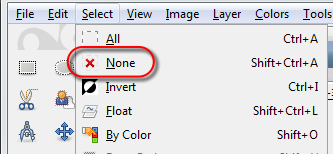
You also need to clear the selection to make sure your changes are applied to the entire layer. Thanks to the anti-aliasing used by the Blend Tool there were actually pixels filled outside your selection and you want to make sure they are included in the effect.
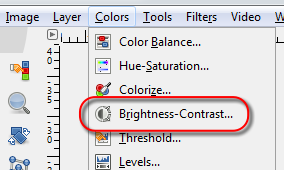
Now select Brightness-Contrast from the Colors menu.

-
1. Preview
- As long as Preview is enabled you will see the changes you make in this dialog reflected in the image in GIMP's main window.
-
2. Brightness
- Set the brightness adjustment to -10.
-
3. Contrast
- Lower the contrast by 15 (adjust by -15). Once again you're looking for the illusion of a backlight being turned on when the button is selected.
The resulting button should look similar to this.
Step 7 - Create 'Activated' Layer
As you should already have guessed, you have one more layer to create to display when the button is activated. This time instead of copying an existing layer you will be creating a new, empty layer. Right-click on the Selected layer (so the new layer will be created at the top) and select New Layer from the context menu.
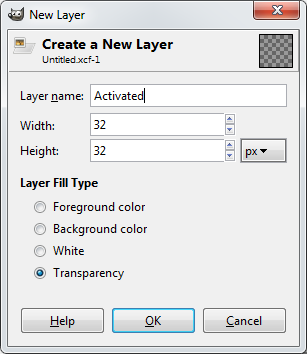
You can name the new layer, calling it Activated of course, directly from the New Layer dialog. Once again you will want to make it the only visible layer and make sure it it selected in the Layers dialog.
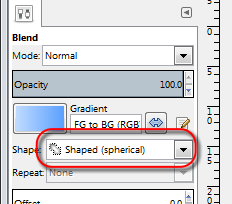
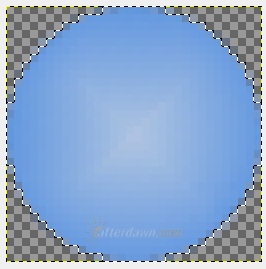
Fill Button With Spherical Gradient
Repeat the steps you used to apply the gradient to the Default layer, except this time set the Shape to spherical.
After you apply the gradient your button should look something like this. Notice that the light area in the middle of the button is larger than on the Selected layer. Once again this is intended to create an illusion, this time of a button being pressed.
Step 8 - Saving The Button Project & Exporting Buttons
Before you worry about exporting your button images you should save the entire project as a GIMP XCF file just like you did for the last set of buttons. But this time around the process of exporting will be a little more complicated.
Since the text buttons you made earlier were almost entirely black there was no reason to worry about exceeding the 256 color limit for Blu-ray subpicture palettes. This time around not only are you using color, there are also gradients involved. That significantly increases the number of colors used. In fact you can be fairly sure there are too many colors for Blu-ray compatibility which means if you use these images for authoring they will be modified by your software. Or, alternatively, you can reduce the palette before exporting.
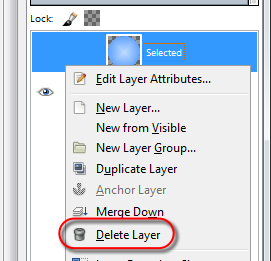
Delete Selected & Activated Layers
Rather than attempting to distill all three layers, which between them have at least two very different ranges of colors, to use no more than 256 colors between them you can simply delete the Activated and Selected layers prior to indexing. Don't forget to save the project (XCF file) beforehand. It's also a good idea to clear your selection again (the None option on the Select menu) to get a clearer look at the border pixels around the button.
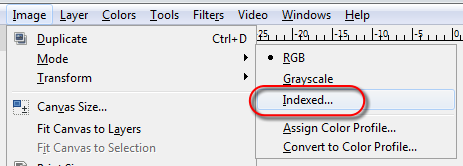
Next open the Image menu and select Indexed under Mode to bring up the appropriate dialog.
-
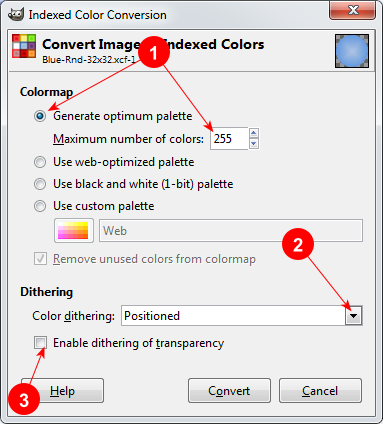
1. Automatic Palette Generation
- By default GIMP will attempt to determine an optimal palette (group of 256 colors) to represent your button image. Make sure the number of colors listed is 255.
-
2. Dithering Strategy
- There are several different algorithms GIMP can use for dithering, which as you should remember is a sort of trick intended to hide the limited resolution of your image. You can also choose None to skip dithering entirely. There is no way to know for sure which of GIMP's dithering approaches will produce the best results, and in fact no guarantee that two people will agree on which one produces the best looking results. You should try them out and decide for yourself. In this case I was most satisfied Positioned dithering.
-
3. Dithering Transparency
- In theory dithering transparency will help hide the inability of pixels in an indexed image to be partially transparent. In practice the results can be very bizarre with pixels appearing to be randomly placed in the middle of transparent areas. For this image I left it unchecked but once again you should try it out and decide for yourself.
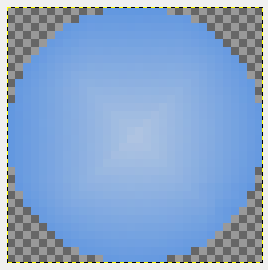
After indexing your image will look similar to this. Notice that the gradient is no longer as smooth and all the extra pixels around the perimeter are completely transparent now. Also keep in mind that you are looking at a drastically zoomed version of the button. If you want any kind of accurate picture of what the button will actually look like on the screen you should set the zoom to 100%.
Export Button Image
Now you can export this layer in whatever format your menu creation software requires. Keep in mind that uncompressed or losslessly compressed formats like BMP, PNG, and TIFF will generally produce the best results.
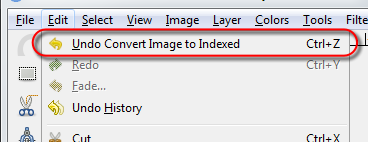
Once you have exported your first button you can repeatedly use the Undo option from the Edit menu to reverse everything you have done since saving the XCF project and repeat the process once more for each layer.
Designing An Entire Menu With GIMP
GIMP's usefulness isn't limited to simple tasks like making button images. Maybe you have a video frame you extracted for use as a menu background using the instructions in Lesson 9. And maybe you want to combine that with the buttons from the second example in this lesson. You could use the techniques from the beginning of this lesson to add text to the background. When you were finished you could even make a mockup of the final menu by adding the buttons just to see how they look.
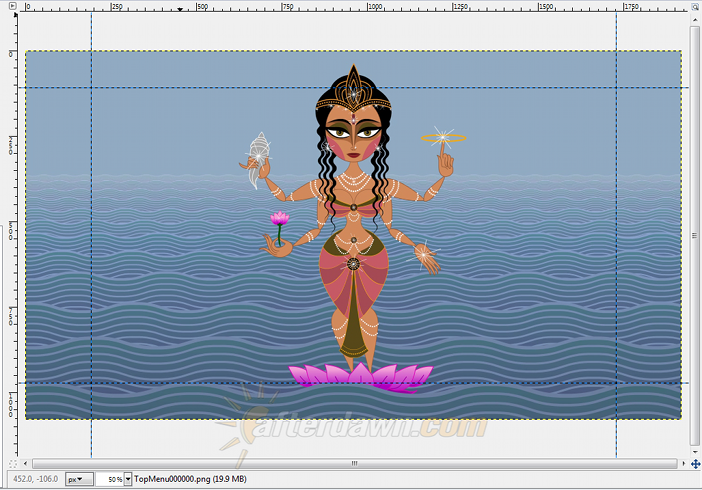
Download the background and try it for yourself
If you would like to try this for yourself you can download the file I'm using (Click here to open in new window) for the background. It's a single frame from the Creative Commons licensed feature film Sita Sings The Blues. The results of this demonstration, as well as the movie itself will feature prominently in an upcoming series of Blu-ray and menu authoring tutorials we will begin publishing in the not too distant future.
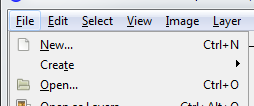
Start by opening the menu background. You can do this from the usual spot on the File menu.
Step 1 - Add Menu Text
Of course the buttons you just made don't include any text, or anything else which would identify their purpose for that matter. Instead you will need to add the menu information to the background image.
Using Guides
Guides are a relatively simple and straightforward feature in GIMP for adding lines over the top of an image. These lines can be used to visually line up elements, but if you use a feature called Snap to Guides they do serve a much more powerful function. When Snap to Guides is turned on and you click in the vicinity of a guide for something like placing the endpoint of a line or starting point of a text layer it is automatically positioned exactly on that guide.
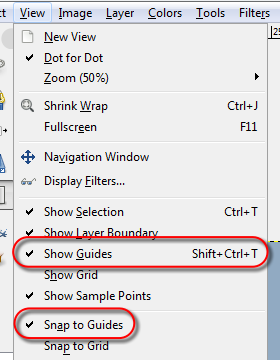
Before you can make use of guides for object alignment you will need to open the View menu to verify that Show Guides is checked so the lines you will be creating are visible and also that Snap to Guides, the feature I mentioned a second ago, is also checked.
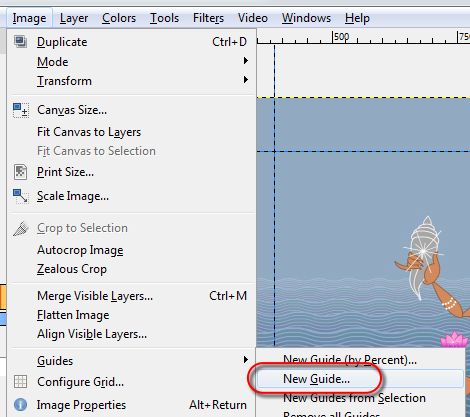
Adding A New Guide By Percent
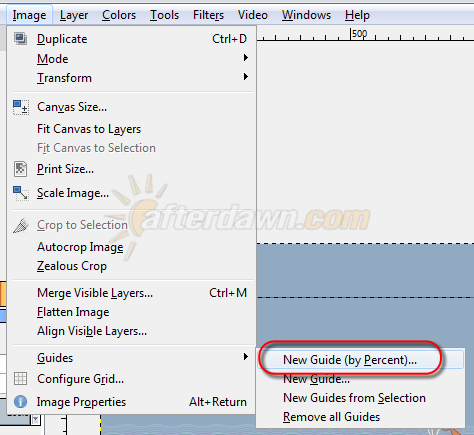
There are several options for creating new guides from the Image menu. Select New Guide (by Percent) to get started.
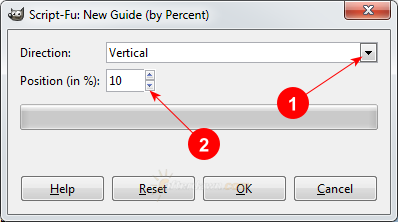
-
1. Horizontal or Vertical
- A guide may be placed either horizontally or vertically across the image. Use this dropdown list to select whichever you want.
-
2. Position
- This is where you tell GIMP how far, as a percentage of total image dimensions, you want your guide placed.
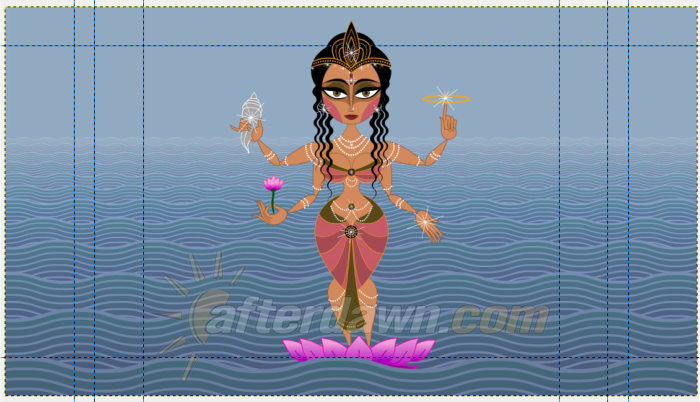
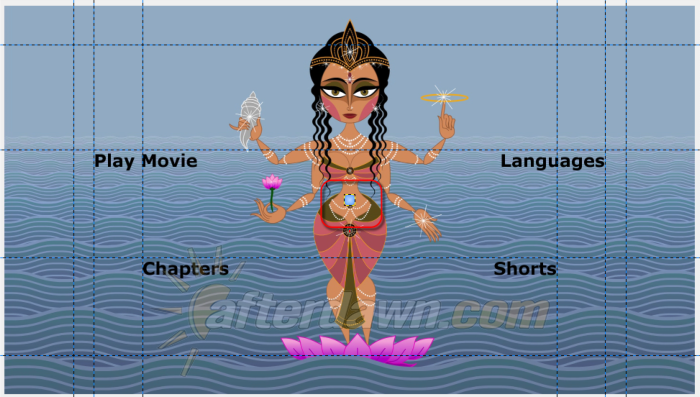
You will want to add a total of four guides to get started. Begin with a horizontal guide at 10% and 90% and then two more at the same percentages vertically. You have just framed the title safe area of your menu. This is the part of the picture which, even if you were playing your disc on a 19-inch CRT SDTV, could be used to display menu elements without fear of TV overscan cutting them off.
Using Guides To Align Menu Elements
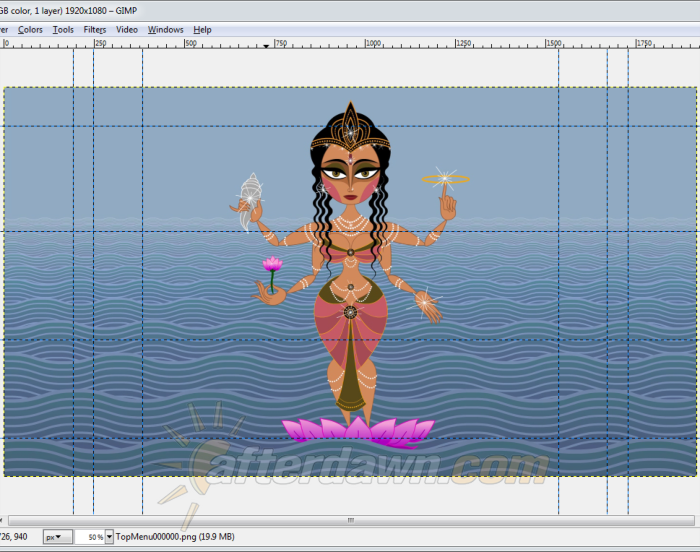
Now that you know where the usable boundaries are you can think about how you want to place your menu buttons. At this point there are no hard and fast rules. Sometimes your choices will be limited by the available space or logical button groupings, but in other cases the choices will be entirely aesthetic.
My menu is going to have a button to play the main feature, another to navigate to a chapter menu, a third to bring up a languages (audio and subtitles) page, and finally one to navigate to go to a sub-menu for playing two shorts (extras) I am putting on the disc. I've chosen a video frame for the background which has areas suitable for menu buttons on both the left and right sides so I will divide them equally between the two. Finally I see that there is more space available for buttons on the lower half of the image so I will be moving the bottom two buttons further toward the middle than the top two.
Now you can add more guides to line up the outside (left and right) edges of the menu text you will be adding shortly. To keep the text reasonably distant from the image in the middle you can put one vertical guide at 13% to line up the top button on the left and another mirroring it on the other side at 87%. Looking at the additional space on the bottom there's plenty of room to put the guides for the bottom buttons at 20% on the left and 80% on the right.
Adding Guides By Absolute Position (line number)
Next you will need a horizontal guide at the top and another toward the bottom to align the text vertically in two groups. Rather than doing this by percentage, You can set the positions for these guides in absolute terms using another option on the Image menu which simply says New Guide.
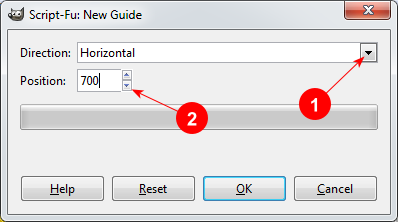
-
1. Horizontal or Vertical
- Once again this dialog requires you to choose either a horizontal or vertical guide.
-
2. Position
- Rather than a percentage, the position referred to here is in lines (or pixels) from the either the left or top side of the image. Place one guide at 400 pixels for the top line of text and 700 pixels for the bottom line.
Adding Text Aligned To Guide Intersections
Now you can start adding text to go with the menu buttons. For the text on the left side of the menu you can use the exact same settings (I'm actually changing the font on mine) as the text buttons in the first example. Rather than simply picking any location, though, you will want to select the intersection of the vertical and horizontal guides corresponding to where you want the button text.
The text on the right side needs to line up to the left of the guide, but dynamic text boxes automatically expand in a fixed direction based on the language. In other words, if words are written and read left to right the textbox will expand in that direction. What this layout needs is to position the right side of the text box adjacent to my guides with the text gradually shifting to the left as I type.
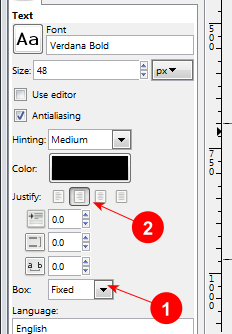
-
1. Fixed Text Box
- If the text box is fixed, rather than dynamic, the text wil expand away from the side it is justified to. In other words left justified text (the default) will expand to the right but right justified text will expand to the left.
-
2. Justify
- Selecting the second option in this row will switch the justification to the right side. Now I can position the text box using the intersection of my two guides and know the right side will remain in a fixed position.
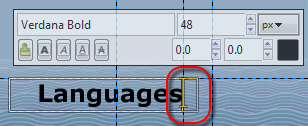
Because this text box is fixed, rather than dynamic, it won't automatically expand to make room for additional text. Instead it must be manually resized using the handles found on each side. Simply drag the handle to make the box grow or shrink as necessary.
Activate Grid For Button Alignment
Now your preliminary menu layout is completed and you should be ready to add the button images from earlier to see how everything looks together.
Since my menu lettering is bigger than my buttons, I need some way to at least estimate the best position for the buttons. That's where a combination of more guides in combination with a feature I haven't talked about yet - the grid - will come in handy. Using a grid is the easiest way to identify the distance between two points, at leaast for very short distances.

Before looking at the grid, there's one more thing to do. You will need more guides, but this time they should line up with the top and bottom of a menu label. Instead of using one of the menu options you can simply click on a ruler, hold down the mouse button, and drag a new guide to whatever location you want. In order to make sure it's positioned exactly where I want it I will also set the zoom to 800%.
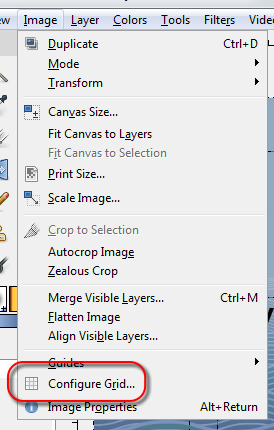
Once you are satisfied with the position your guides are in it's time to open the Image menu and the grid configuration dialog.
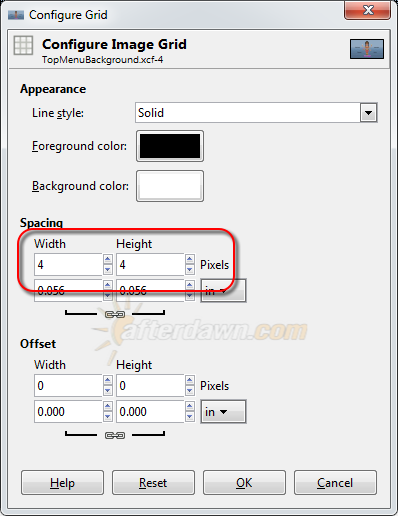
Set Grid Spacing
I find that the optimal setting for quickly eyeballing want to make sure the grid is relatively small. In fact I'm going to set it to an extremely low value of 4. That means each line on the grid will be 4 pixels away from the closest parallel line.
-
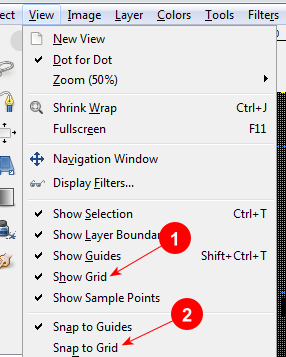
1. Show Grid
- Checking this makes the grid visible.
-
2. Snap to Grid
- This works the same way as Snap to Guides except of course that it makes the mouse pointer jump to the closest grid line instead of the closest guide. You can leave this unchecked since I'm only using the grid to approximate distance.

One last thing which may make your life easier is correcting any offset between the guides and grid. At the very least it's a good idea to make sure one of your guides lies directly on a grid line. In my case both the guide above and the guide below the text is off by 1 pixel in the same direction. That means once the offset is correct they will both fall directly on the grid.
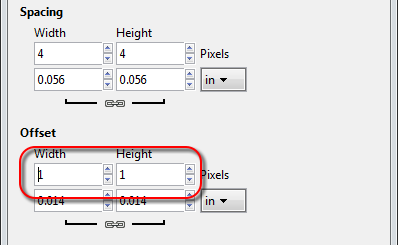
By adjusting the position of the grid by 1 pixel I positioned a gridline directly under one of my guides. Now all I have to do to count the number of lines from one guide to the other and multiply by four.
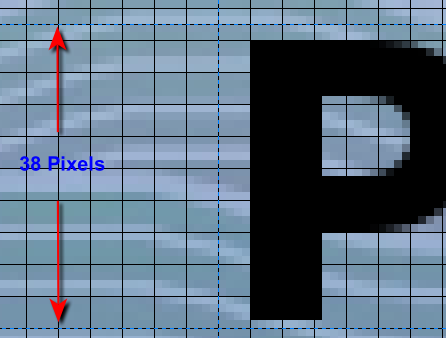
For example, in this case there are 9 full grid spaces and two more lines between the two guides. Since my menu buttons are 32�32 pixels and this space is 38 lines tall (9 � 4 = 36 + 2 = 38). I want to make sure my menu buttons are as close to centered on the text, vertically, as possible. I'm going to move each guide 3 lines toward the center. To begin moving guides you just have to click once on the ruler first and then drag the guide where you want it.
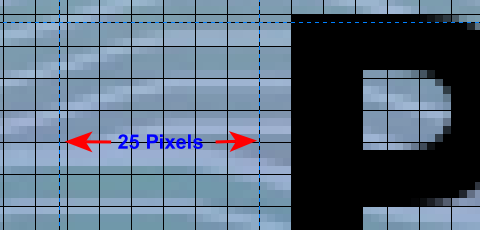
Before importing buttons I am also going to drag some vertical guides onto the image so that each menu label on the left has a vertical guide which intersects with two horizontal guides in the spot where the button belongs.
Importing a menu button image.
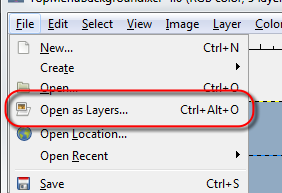
To add an existing Blu-ray button image to an open file you can use Open as Layers from the File menu. The button image appears in the very center of the menu background.
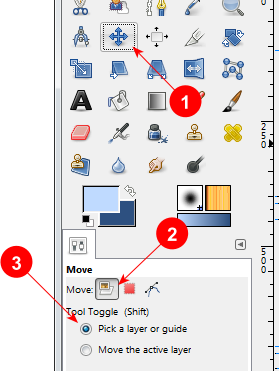
Moving The Button
To move your button to the correct place on the menu background you will use the Move Tool.
-
1. Move Tool
- This button selects the Move Tool.
-
2. Layer
- Make sure Layer is selected.
-
3. Pick A Layer Or Guide
- This option allows you to drag any layer you can click on without making it the active layer from the Layers dock first.
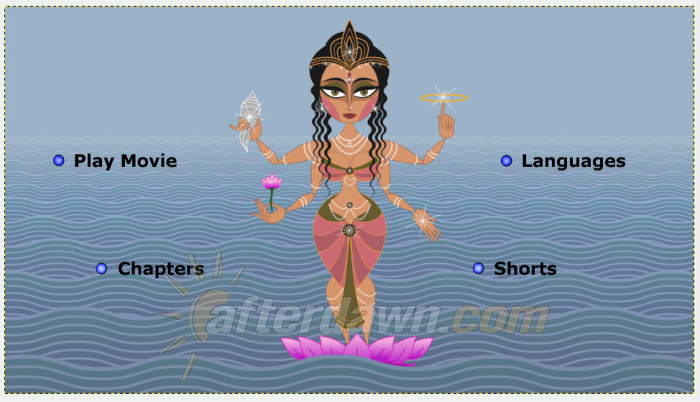
Drag the top button to the correct location, next to one of the menu captions, then repeat for each of the the other three buttons. Make sure to add each version of the button (default, selected, activated) at least once to see what it looks like integrated with the background.

-
1. Normal Buttons
- These buttons are the default image which will appear when a button is neither selected nor activated.
-
2. Activated Button
- This is what my button will look like when it's activated. It's distinguishable from the selected variant becaues the light blue section in the middle is bigger. Once the colors are fixed it will probably be fine.
-
3. Selected Button
- This is why the button will look like when its selected. Besides needing a slight color change to become more visible it seems alright.
And this is a good example of the benefit to doing a mockup while you are preparing assets. You could certainly wait until you got to the authoring stage, and perhaps it wouldn't take any more time, but personally I prefer not to stop and go back to redo my previous work.
Fixing The Buttons
Obviously the big problem so far is that the color scheme for the buttons doesn't work with this background. On the other hand the basic design is sound so it's just a matter of tweaking things to improve visibility. Since these buttons were simple and quick to make, it's probably simpler to just start over, albeit with a slightly different approach. Here's how I handled it.
1 - Make A New Image With 4 Layers Instead Of 3
The second time around I decided to change a few things. For starters I didn't put anything in the Normal layer. Looking at the completed menu I decided it would look better if the Normal buttons didn't show up at all. Keep in mind the button I created isn't blank. It's actually full of transparency which is as much an image component as red, green, and blue.
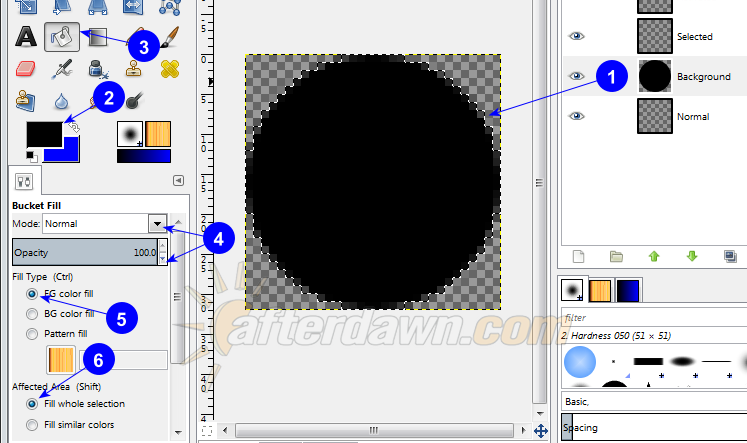
-
1. Ellipse Select
- First I selected a circle all the way to the edge of the image just like the previous attempt.
-
2. Foreground Color
- I set the foreground color to pure black.
-
3. Bucket Fill
- I selected the Bucket Fill Tool which fills an area with one solid color.
-
4. Mode & Opacity
- I set Mode to Normal and Opacity to 100%.
-
5. Foreground Color Fill
- I set the Bucket Fill Tool to use the foreground color.
-
6. Fill Whole Selection
- I selected Fill Whole Selection and then clicked inside the circle.
Next I repeated the original steps used to create the Selected and Activated buttons, but with two major changes. The first was the size of the circle. I cut down the size by two pixels with plans to combine it with the black circle as a border. Just as importantly I changed the background color to a much more intense blue to provide contrast with the menu background.
2 - Adding The Border
When I exported the new and improved buttons I changed things up again. Instead of saving each image individually I kept the black circle in the picture (literally) which combined them into a single PNG file. As you can see from the new version of my menu mockup, the difference is striking. The original actually looks even better because the blue on the buttons became purple in these images.
Tweaking Text Layout
My final changes were to make minor adjustments to the position of the text elements I added to the background, moving them so their inner edges are spaced equally from the center of the background. This is really just a matter of personal preference. You can line things up however it looks good to your own eyes.
Exporting The Menu Background
Once you have your menu arranged the way you want it, you can export the background as a PNG image, using the instructions in Lesson 9 for loading and encoding images in MeGUI.
Hide Buttons
Obviously before you export the background you will want to make sure the layers with the button images aren't visible. You could remove them completely, but I prefer to leave them in the project file so I can quickly see what they look like. Instead I recommend just turning off visibility for each of the button layers.

Just like you did with the buttons, you can now export the menu background as a PNG file. You will then be able to use the steps listed in Lesson 9 to load this file for encoding by writing a simple AviSynth script.
Menu Design With GIMP
Hopefully at this point you are starting to get an idea of not just some of the things you can do with GIMP, but also the importance of spending the time to get your menu layout right before you jump into the authoring phase. As my last example showed, it's easy to have individual pieces which seem fine on their own but fail disastrously when used together.
And the handful of tricks demonstrated in this lesson are just a small sampling of what GIMP can do. It may lack the slick interface and some of the more advanced intelligence of Photoshop, it is more than capable of handling the vast majority of tasks required for creating Blu-ray menus.
Coming Soon...
Now that you have a grasp of some basic techniques for designing menus and creating the assets (buttons, backgrounds, etc,...) which go into them, the next challenge is to use those skills to make a chapter menu featuring thumbnails. This can be done using nothing but techniques you have already learned over the course of the last two lessons. Once completed, the next lesson will focus on doing just that.
How To Create Buttons In Gimp
Source: https://www.afterdawn.com/guides/archive/afterdawn_blu-ray_encoding_tutorial_lesson_10-make_menu_buttons_with_gimp.cfm
Posted by: cookshiled.blogspot.com
0 Response to "How To Create Buttons In Gimp"
Post a Comment