

How To Create Veeam Recovery Media
Step 2. Create Custom Veeam Recovery Media
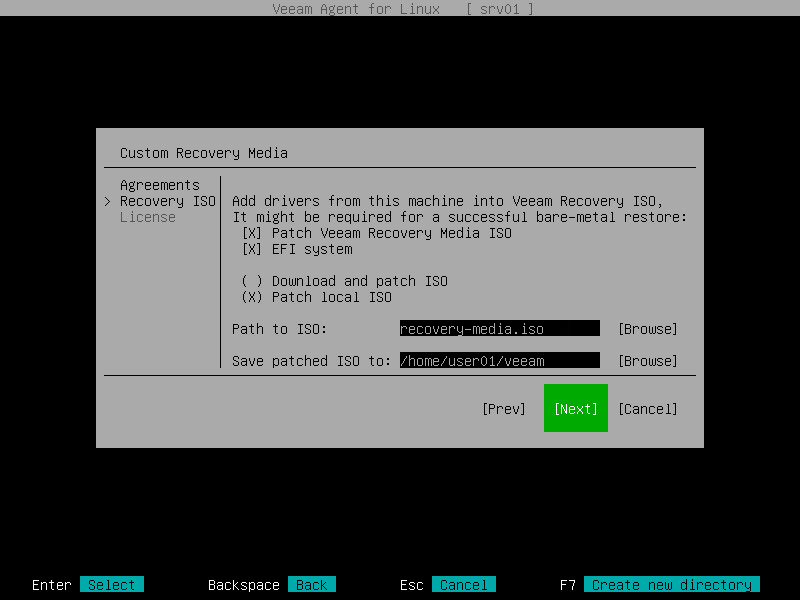
At the Recovery ISO step of the initial setup wizard, specify settings for the custom Veeam Recovery Media.
In addition to the generic Veeam Recovery Media that is available for download at the Veeam website, you can create a custom Veeam Recovery Media. This option may be helpful if your computer uses hardware that requires drivers not included in the generic Veeam Recovery Media. When you create the custom Veeam Recovery Media, Veeam Agent for Linux copies the Linux kernel running on your computer with its currently loaded modules and includes them into the custom recovery media.
Before you create a custom Veeam Recovery Media, check the following prerequisites:
- The Linux system must have the genisoimage package installed. For openSUSE and SLES 15 SP0 – SP3 distributions, t he Linux system must have the mkisofs package installed instead.
- The Linux system must have the mksquashfs and unsquashfs utilities installed.
- For custom Veeam Recovery Media with EFI support, the Linux system must have the following packages installed:
- xorriso
- isolinux (or syslinux , if the software package repository of your Linux distribution lacks the isolinux package)
- For the scenario where you create a custom Veeam Recovery Media using the Download and patch ISO option, the Linux system must have the wget utilitiy installed.
| |
| If you do not want to create a custom Veeam Recovery Media at the process of initial product setup, switch to the Next button with the Tab key and press Enter . You will proceed immediately to the License step of the initial setup wizard. You can create the custom Veeam Recovery Media later, at any time you need, using the Veeam Agent for Linux command line interface. To learn more, see Creating Custom Veeam Recovery Media. |
To specify settings for the custom Veeam Recovery Media:
- Make sure that the Patch Veeam Recovery Media ISO option is selected and press Space .
- If you want the Veeam Recovery Media to be able to boot on EFI-based systems, select the EFI system option with the Tab key and press Space .
If you do not enable this option, the custom Veeam Recovery Media will be able to boot on BIOS-based systems only.
- Press Tab and select how you want to create a custom Veeam Recovery Media depending on the location of the generic recovery media ISO file:
- If you did not download the generic Veeam Recovery Media from the Veeam website, make sure that the Download and patch ISO option is selected and press Tab . When you start the custom recovery media creation process, Veeam Agent for Linux will download the ISO file of the generic Veeam Recovery Media from the Veeam software repository to the /tmp/veeam directory on the Veeam Agent computer and use this image to create the custom Veeam Recovery Media.
Veeam Agent for Linux automatically downloads one of the following Veeam Recovery Media ISO files depending on the Veeam Agent computer architecture:
- veeam-recovery-i386-5.0.0.iso — for x86 computers that run Linux kernel version 3.16 and later. The size of the downloaded ISO file is 460 MB.
- veeam-recovery-amd64-5.0.0.iso — for x64 computers that run Linux kernel version 3.16 and later. The size of the downloaded ISO file is 490 MB.
- veeam-recovery-media-5.0.0.iso — for x86 and x64 computers that run Linux kernel version earlier than 3.16. The size of the ISO image file depends on the Veeam Agent computer architecture: 136 MB for x86 computers and 139 MB for x64 computers.
- If you have already downloaded a recovery media ISO file to a local directory on the Veeam Agent computer or to a network shared folder, select the Patch local ISO option with the Down key and press Tab . If you select this option, you will be able to specify a path to the ISO file of the generic Veeam Recovery Media.
The name of the generic Veeam Recovery Media ISO file depends on the recovery image version, Veeam Agent computer architecture and the source from which you downloaded the ISO file: from the product download page or Veeam software repository. To learn more, see Veeam Recovery Media Versions.
- If you have selected the Patch local ISO option, in the Path to ISO field, specify a path to the ISO file of the generic Veeam Recovery Media:
- Select the Browse option with the Tab key and press Enter .
- In the Path to ISO window, select the necessary directory and press Enter .
- Repeat the step 'b' until a path to the directory in which the recovery media ISO file resides appears in the Current directory field.
- In the directory where the recovery media ISO file resides, select the ISO file and press Enter .
- In the Save patched ISO to field, specify a path to the resulting ISO file of the custom Veeam Recovery Media:
- Select the Browse option with the Tab key and press Enter .
- In the Save patched ISO to window, select the necessary directory and press Enter .
- Repeat the step 'b' until a path to the directory where you want to save the resulting custom recovery media ISO file appears in the Current directory field.
- Select the OK button with the Tab key and press Enter .
- To start the custom recovery media creation process, select the Next button with the Tab key and press Enter .
Related Topics
Veeam Recovery Media
Related Tasks
Creating Custom Veeam Recovery Media
How To Create Veeam Recovery Media
Source: https://helpcenter.veeam.com/docs/agentforlinux/userguide/val_first_steps_iso.html
Posted by: cookshiled.blogspot.com
0 Response to "How To Create Veeam Recovery Media"
Post a Comment