

How To Draw A Vertical Line In Google Docs
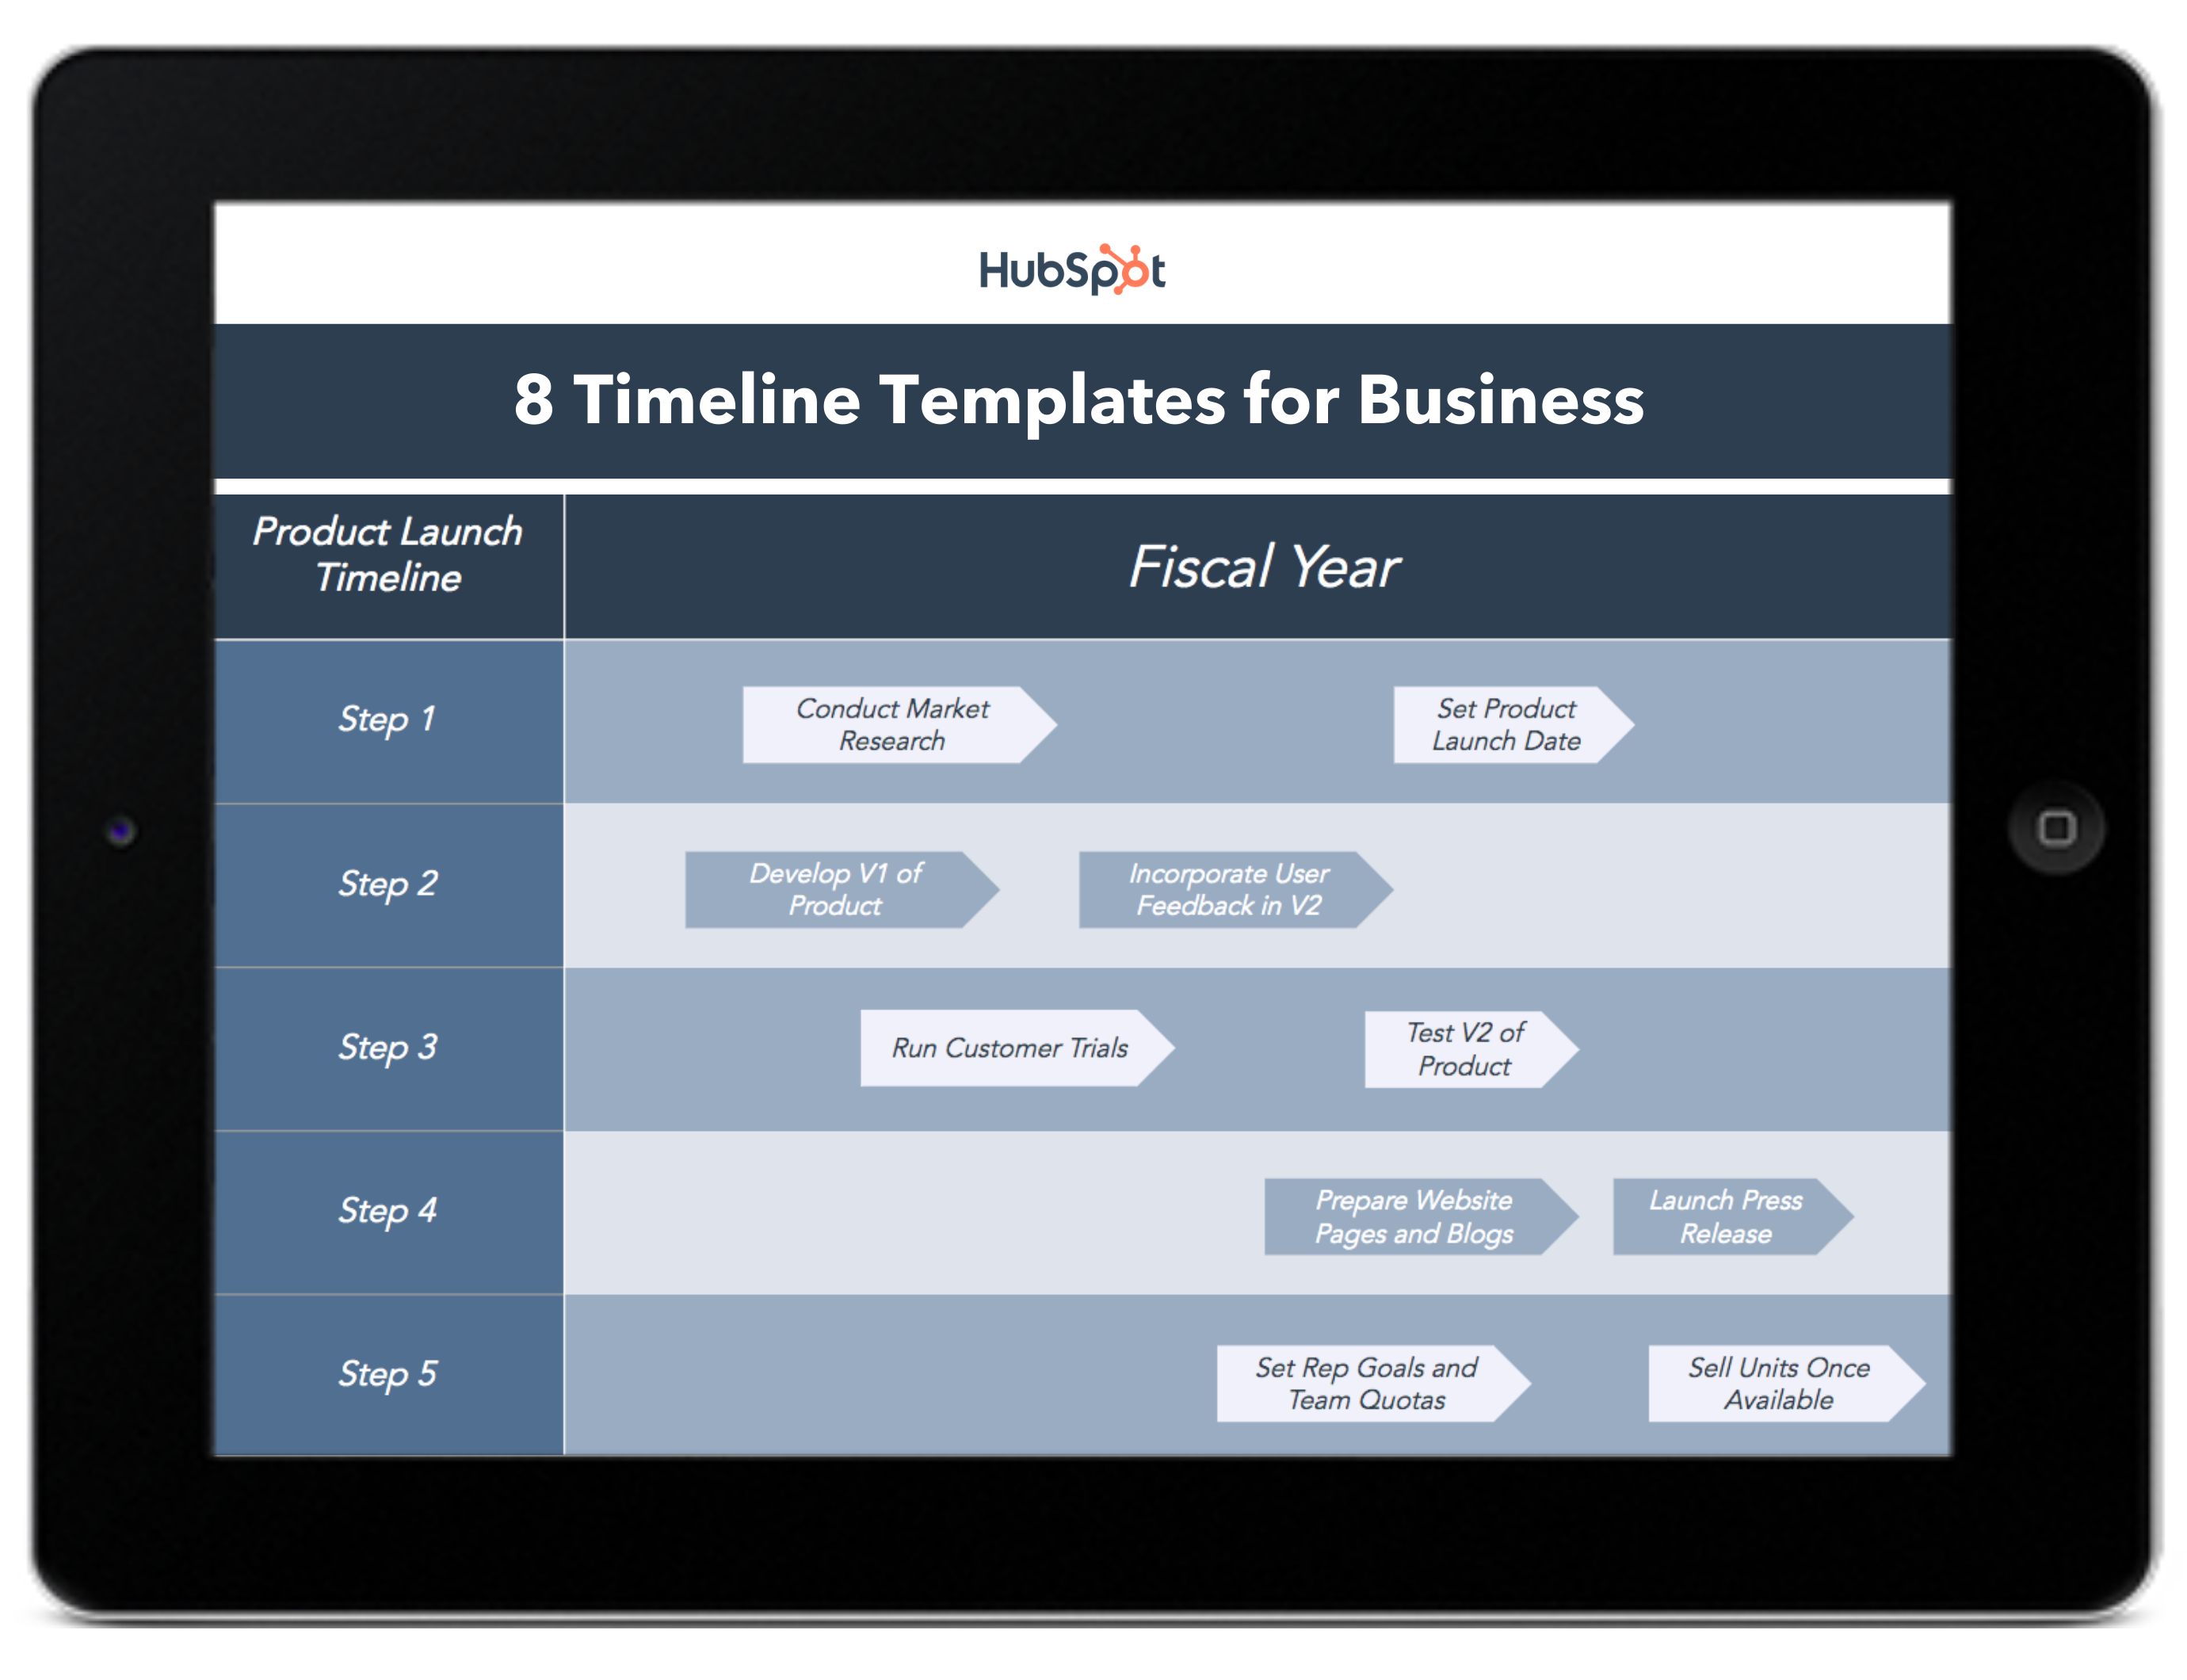
Infographics are a great way to capture user attention and communicate key concepts. Why? Because they combine relevant information with graphic impact to increase retention and engagement. Data backs upward this common-sense assertion: Research found that people retain 65% of the data they meet — but only 10% of the information they hear — and spend 39% less time searching for the content they demand when information technology's displayed in infographic format. I of the most compelling uses for this functional format? Timeline graphics. These date and data delivery vehicles offer a mode to quickly communicate important information — from cardinal dates in your company's history to upcoming projection milestones or predicted market trends. Of course, it's one thing to see the value in timeline graphics and some other to actually create bonny and constructive visuals. There are a number of nifty timeline makers out at that place. In this piece, we'll tackle timeline tactics for familiar applications including Google Docs, Word, Excel, Google Sheets, and Powerpoint. 3...2...ane...let's go! While there's no single format for timeline graphics, the most mutual composition uses four parts: Each timeline element contains all iv parts, and elements are then arranged in left-to-right order of oldest-to-newest events. This format offers simplicity of grade and office — elements are piece of cake to read and identify, and the "menstruation" of time is unproblematic to spot. Permit's say you're creating a timeline of key events in your corporate history using this framework. It might expect something like this: This (very basic) instance was made in Google Docs and uses an arrow to denote the passage of time. Dates above the line are paired with cursory details below. Some timelines volition include both a header — such as merger — with a longer description beneath. How much information is worth including depends on the complication of the topic at hand, who's going to exist using the chart, and its overall purpose. In this case, our graphic element is the line itself but you lot can also insert relevant images of people or places associated with the consequence to increase user appointment. Another common graphic timeline format runs elevation-to-bottom with before dates at the top of the page and afterwards dates further downwards. To maximize space many of these tiptop-to-bottom templates alternating information left-and-correct downwardly the line. So how practice you brand a timeline graphic? Head to "Insert", and so select "Drawing" and "+ New". This will bring up a new window that looks like a checkerboard. Select the "Line" push from the top menu and cull "Arrow". And so, draw a line beyond the screen. To brand sure it'due south direct, await at the left-manus side — if you lot only run across one line, it'due south level. If you come across more than one, it'due south at an angle. Click on the Text Box tool — represented equally a T surrounded by a box — and create a box above or below your line to start adding details. Y'all tin either copy and paste multiple boxes to ensure consistent sizing and spacing or use a single, giant text box. While the latter selection is quicker to create (we used information technology) the natural left-to-correct format of the box means you're limited in how data appears. When you lot've entered all of your timeline data, click "Salvage and Close" and the image will exist automatically added to your Google Physician. Peradventure you don't like Google Docs, maybe your company uses Microsoft Office exclusively, or maybe yous don't like the idea of potentially shared timelines. Whatever the instance, it's also possible to create a timeline graphic in Give-and-take. Open a new Discussion document and head to the "Insert" tab, then select "SmartArt". From the new menu that appears, select "Procedure". This will bring up a host of potential timeline graphic options, everything from single, large arrows to connected text boxes to linked circles. The simplest selection is the "Basic Timeline" which contains dots embedded in a large, transparent arrow. Apply the text pane located on the left-hand side to enter your timeline data. Pressing "Enter" creates a new timeline entry — if you demand to add more data to a specific timeline detail, press Shift+Enter to create a line break. Customize your timeline dots and arrow with shapes or colors to achieve your desired look. Word does not automatically summate time between events; as a effect, all items on your timeline will be equidistant from one some other. If you demand to communicate a larger bridge of time, yous can drag events further apart manually, only this volition eventually distort the graphic. If you enjoy using Microsoft Office for creating timelines but want to make things more difficult for yourself, try edifice an Excel timeline. While the finished product offers easily-accessible information in a familiar format, the effort required is significantly more substantial. Create a three-column table in Excel that contains your timeline data. Utilize the commencement column for dates and the 2d for event titles. In the last column, enter a series of numbers — these numbers will determine the height of your timeline plots. You can prepare them all to the same meridian with the same number or different heights in a repeating pattern depending on your preference. Select "Insert" from the top Excel menu, and so "Charts", and so select a Scatter nautical chart. Right-click the chart that appears and cull "Select Data Source." Select the "Add" push in the "Legend Entries (Series)" menu that appears. Click on the pocket-sized spreadsheet prototype that appears side by side to the "Series X values" box, then choose the column of dates y'all created. Then, select the small spreadsheet side by side to the "Serial Y values" box and choose the information in your timeline height column. Click "OK" and yous'll create a scatter chart with dates at the bottom and dots at varying heights. Select your chart and find the "+" in the upper-right to bring upwards the Chart Elements card. Uncheck "Chart Title" and "Gridlines", then cheque "Data Labels" and "Mistake Bars" Head to the "Mistake Bars" bill of fare option and select "No Line" for your Series 10 Error Bars — this will remove the horizontal lines on each side of your data points. For your Series Y Error Confined, set the direction to "Minus" and the Error Amount to "100%". This will create vertical lines between your dates and your data points. In the "Format Centrality" menu, select "Series 1 Data Labels", uncheck "Y Value", and select "Value from Cells." Then, click the small spreadsheet icon. Select your event titles column and and so click "OK". This should create a basic timeline with dates forth the lesser and data points at varying tiptop, each with a minor description above. If desired, you lot can add together extra formatting and color options from the Format Data Series menu. The polar opposite of Excel, Google Sheets makes information technology easy to create project timeline. Open Google Sheets and select the "Project Timeline" choice. Edit your timeline. Modify any text box, add colors, and modify dates as required. While customization is bounded by the basic format of this Gantt chart, Google Sheets offers one of the easiest ways to create and share a timeline. Making a timeline in PowerPoint is virtually identical to the procedure used in Word. Head to the "Design" tab and select your theme. Click on "Insert", then "SmartArt". Select the timeline you prefer and it will exist created with iii elements. Add text to the elements straight, and use "Add Bullets" to add bullet points beneath. Select "Add Shape" to boosted timeline sections. Timeline graphics add user-friendly context to otherwise dry data points. From details about your company from inception to electric current interaction to in-depth projection milestone markers, visual timelines in Google Docs or Sheets, or Microsoft Discussion, Excel, or PowerPoint offer a style to capture critical data while simultaneously boosting viewer interest and bolstering information memory. ![→ Access Now: 16 Timeline & Flowchart Templates [Free Tool]](https://no-cache.hubspot.com/cta/default/53/6aa60787-a844-4b56-ab23-2b2aa079e7fc.png)
What is a timeline graphic?
How to Brand a Timeline on Google Docs
Featured Resource: eight Free Timeline Templates for Business
 Download Now for Free
 1. Create a picture.
2. Outset drawing.
3. Enter your text.
four. Salvage and close.
How to Make a Timeline in Word
1. Insert SmartArt
2. Observe your timeline.
iii. Enter your data.
4. Customize your timeline.
How to Make a Timeline in Excel
ane. Create a data table.
2. Insert a besprinkle chart.
iii. Import your data.
four. Eliminate gridlines, add together fault bars.
5. Connect the dots.
half-dozen. Insert outcome titles.
How to Make a Timeline in Google Sheets
1. Create a new timeline.
2. Customize.
How to Brand a Timeline in PowerPoint
1. Select your design.
two. Insert SmartArt.
iii. Cull and fill your timeline graphic.
Timing is Everything

Originally published Jan 1, 2021 7:00:00 AM, updated February 08 2022

Source: https://blog.hubspot.com/marketing/make-a-timeline
Posted by: cookshiled.blogspot.com
0 Response to "How To Draw A Vertical Line In Google Docs"
Post a Comment