

How To Draw And Paint A Realistic Moose
How to Depict Copse
Updated: 24 February 2022
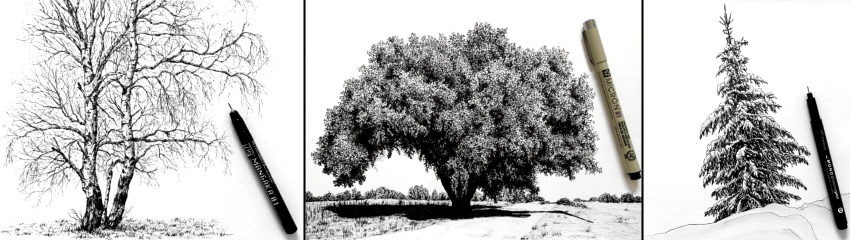
In this guide, I will demonstrate how I simplify the drawing process, and I hope that by the end of it you lot will be able to draw your favorite tree.
In order to depict realistic trees with pen and ink, it is of import to pay attention to accuracy of the form (construction), and to learn how to create the illusion of effulgence values and transitions with pens.
Bamboo
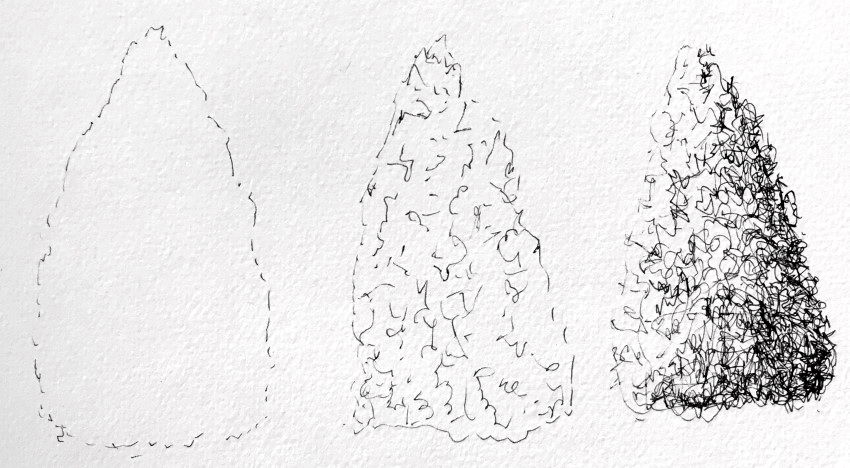
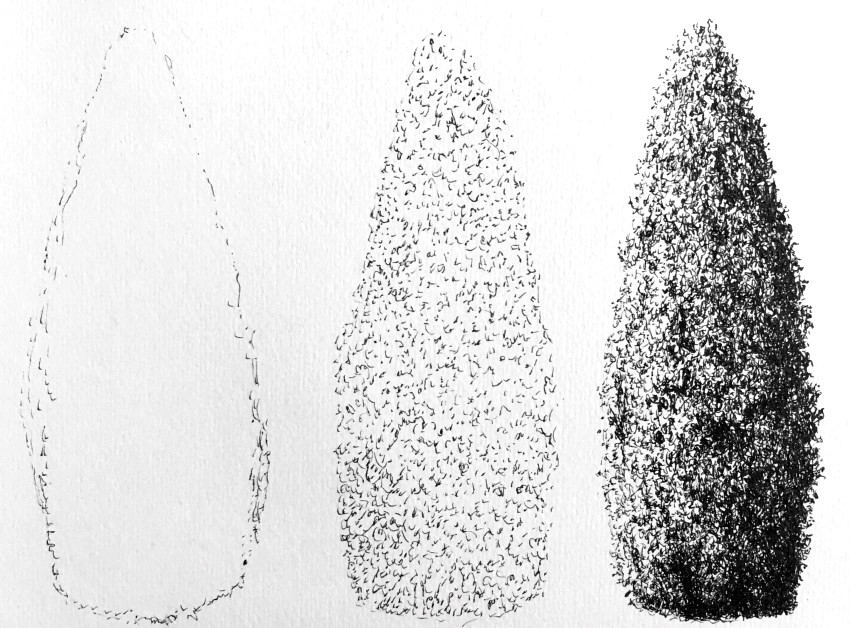
When looking at ANY tree, examine its bones shapes.
Information technology is a proficient practice to draw its uncomplicated shapes commencement:
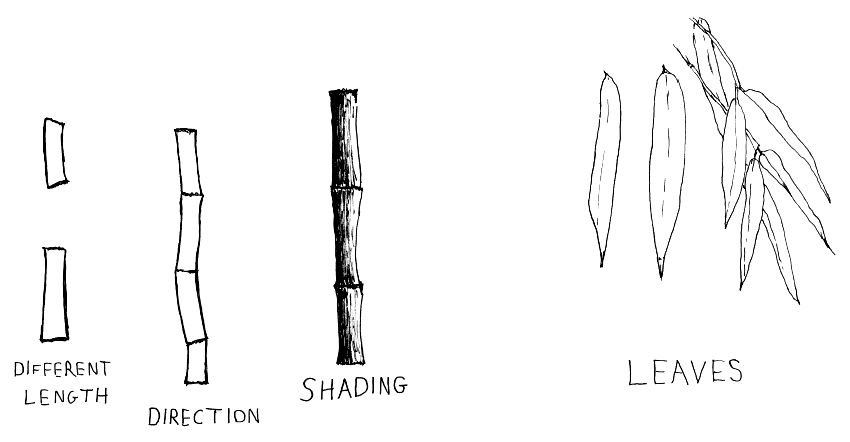
In one case yous understand these simple shapes, you can use your artistic license and your knowledge to recreate it.
In that location is no signal drawing every unmarried leaf as you come across it (when using a reference image as a guide).
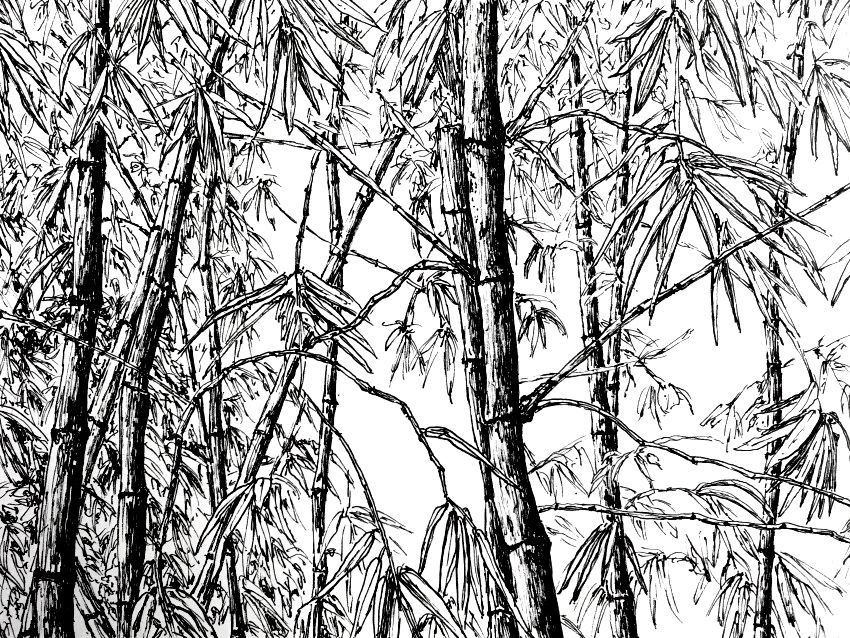 Bamboo
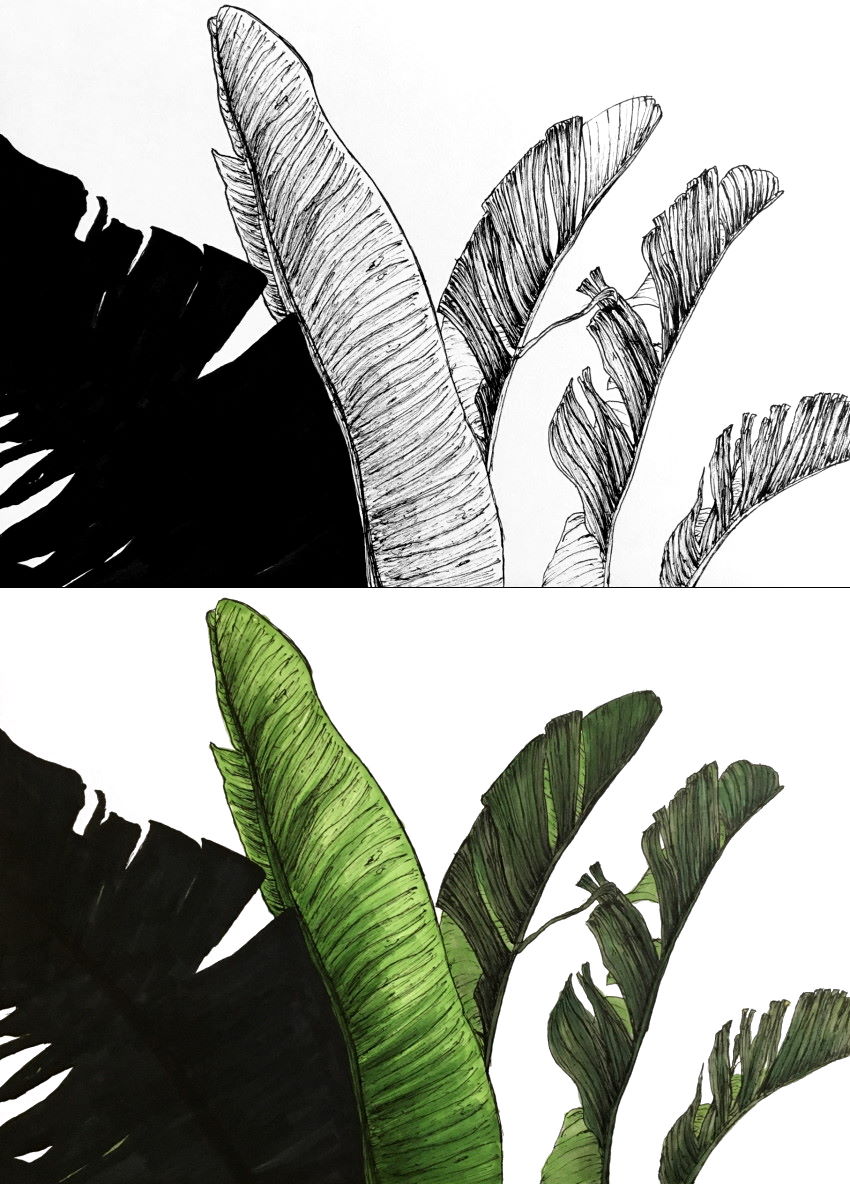
Banana Tree
For trees with large leaves, like a banana tree, showtime draw a written report of the leaves from different angles.

For a realistic outcome, make sure there is no symmetry, and that each foliage is unique.
Y'all can utilize markers; they work well with pens.
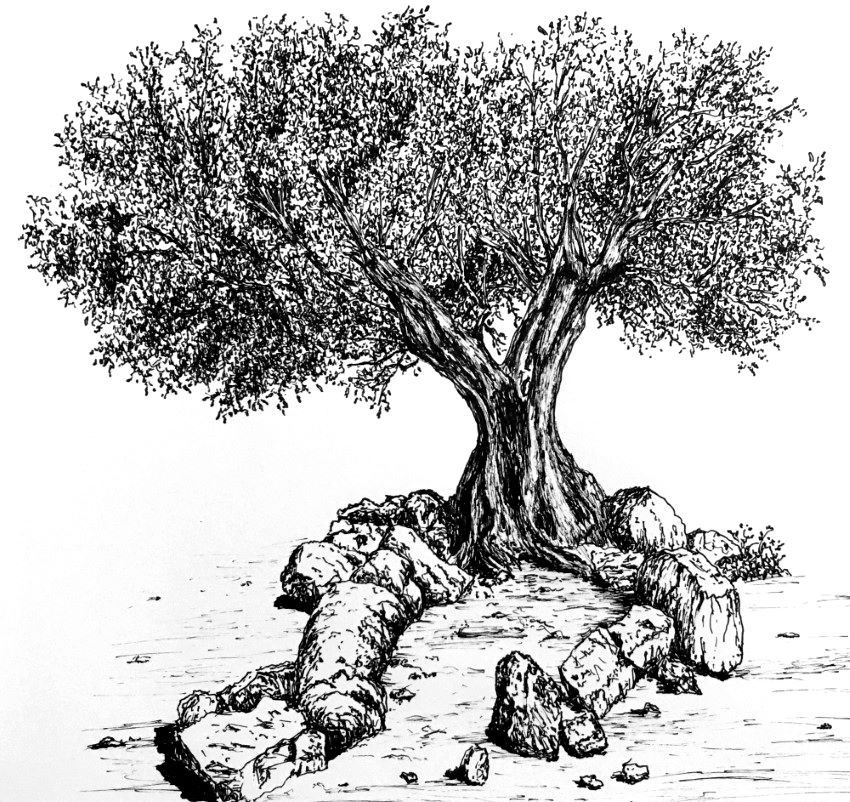
Olive Tree Body
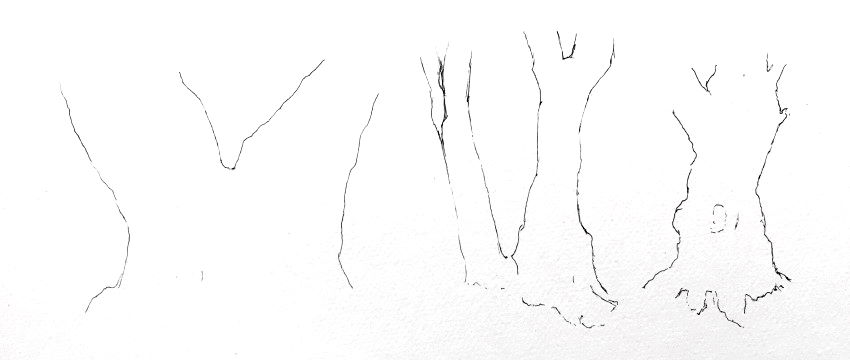
Look at some reference images, or bodily trees, before drawing the tree trunk.
Start, draw outlines to create the form (structure).
Retrieve:
Draw thin and gentle outlines, so they are not bold.
Next, add together some guidelines and basic details.
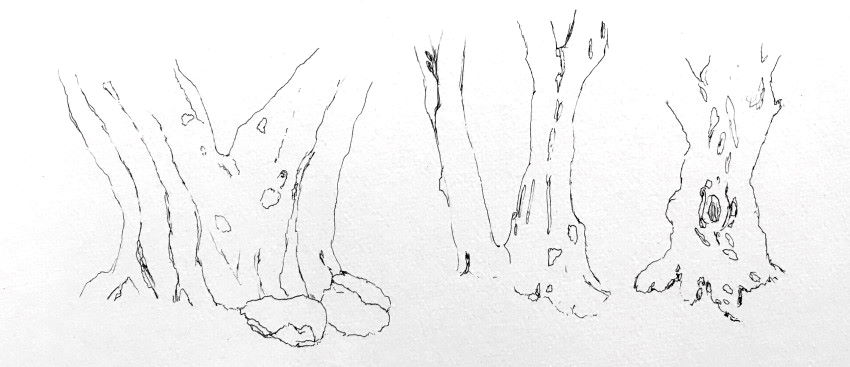
Last step is texture cartoon.
Focus mainly on brightness values, while drawing marks with shape and management like the reference paradigm.
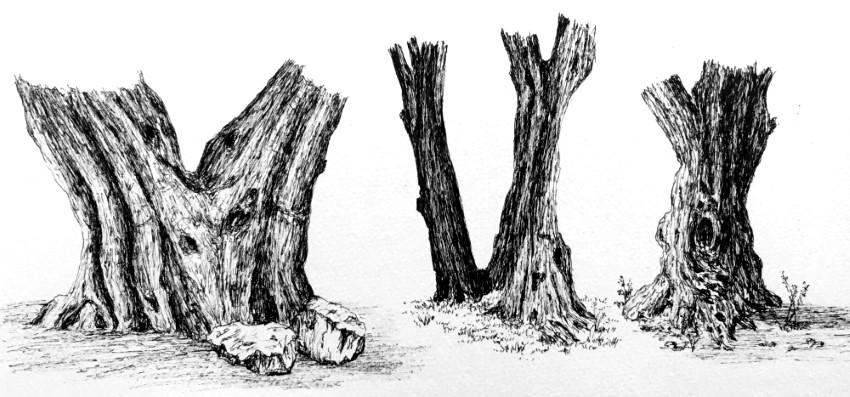 Olive tree trunks
Go along in mind:
Each olive tree trunk has its own "personality", merely all olive trees share common basic shapes.
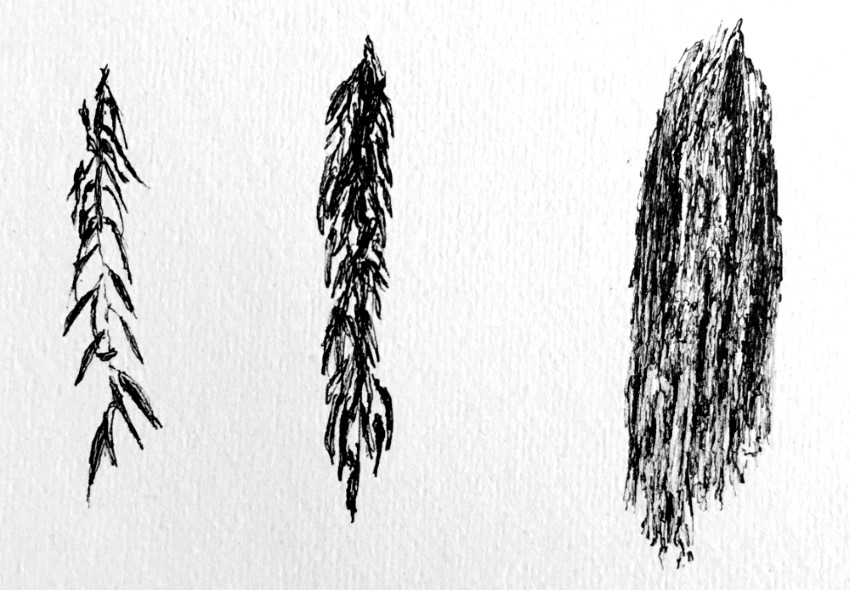
How to Describe Leaves
Cartoon leaves can be challenging. Agreement their structure, and breaking the drawing procedure into steps, will produce a satisfying and realistic result.
Each tree leaf is in dissimilar direction, has a different degree of foreshortening, and is overlapping other leaves.
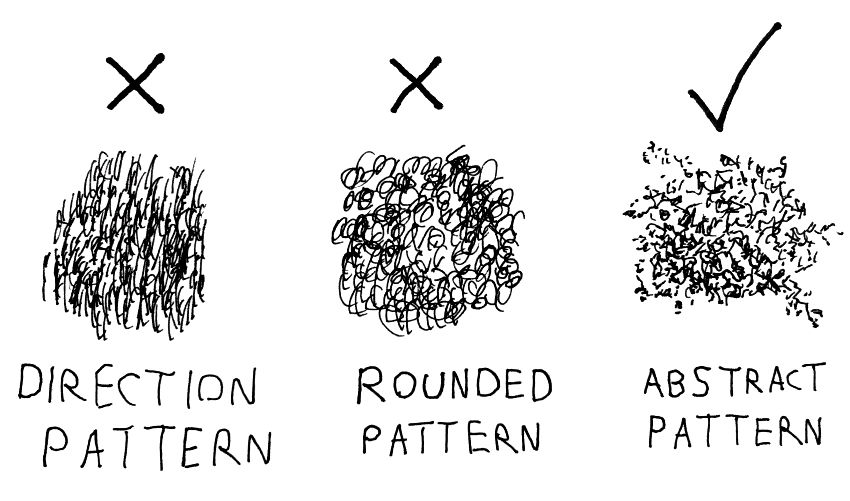
Just put, the form and texture of leaves is abstruse and messy.
To depict that, you need to exist sketchy and loose with your marks, and to avoid any blueprint!
Adjacent pace is to pay attending to brightness values. That is how you create the illusion of volume. Significant, three-dimensional and not flat.
To create that illusion, scribble more lines for darker values, and fewer lines for brighter values:

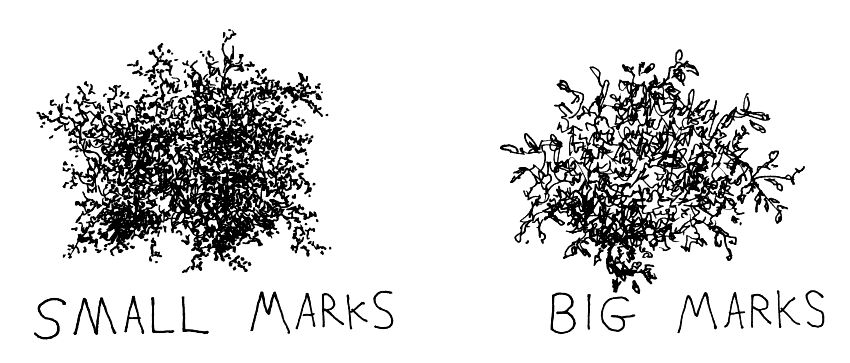
In addition, pay attention to leaves size, depending on the tree type, and how afar it is from the observer.
For big leaves, sketch large marks, and vice versa:
While the treetop is messy, at its edges you can add together some indication of leaves blazon and size.
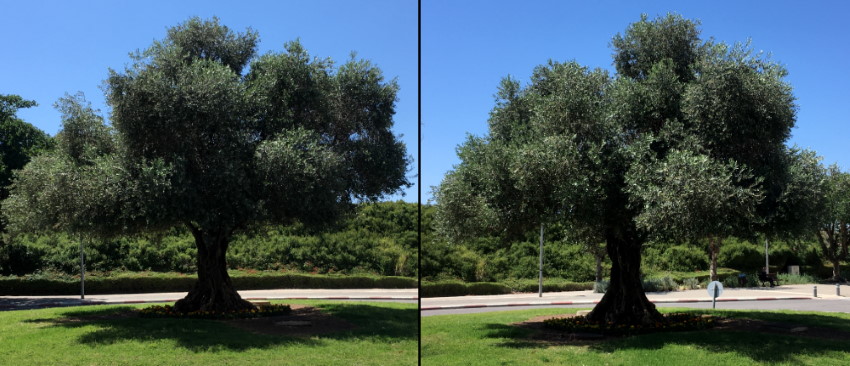
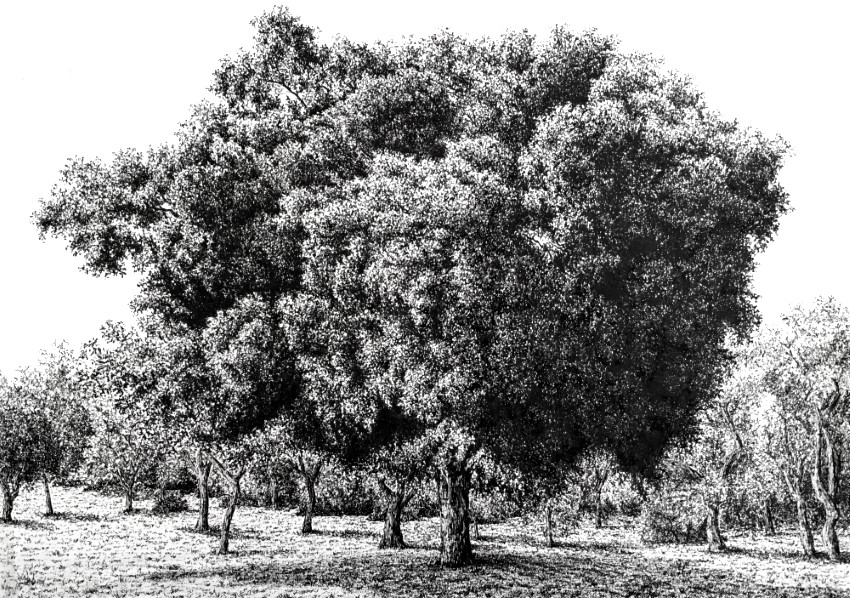
 Olive tree
After agreement the characteristics of a specific tree (olive tree in this example), it is quite easy to draw it from imagination.
If some terms like foreshortening and overlapping are new to you, read my guide on how to draw with a sense of depth. It covers 15 methods to add together depth to your drawing or painting.
Proficient to know:
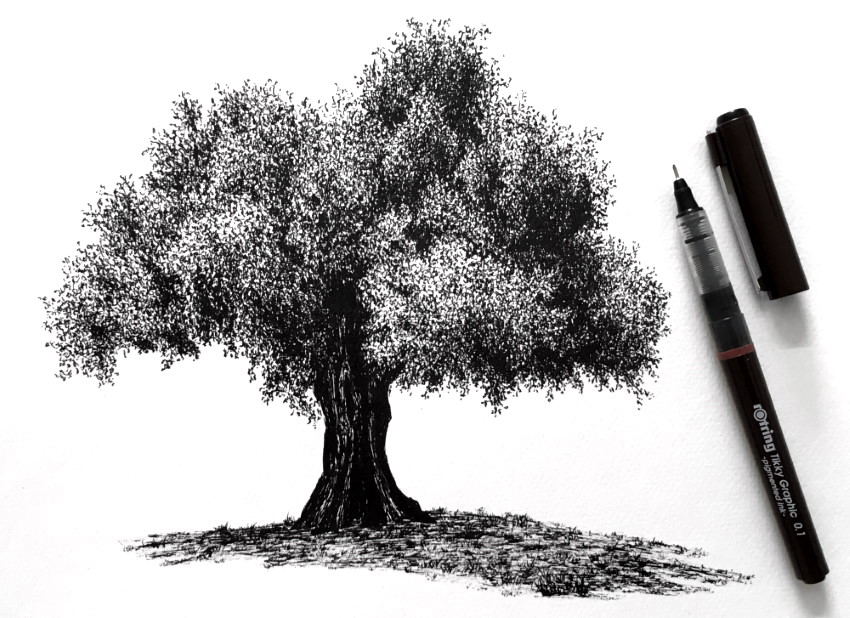
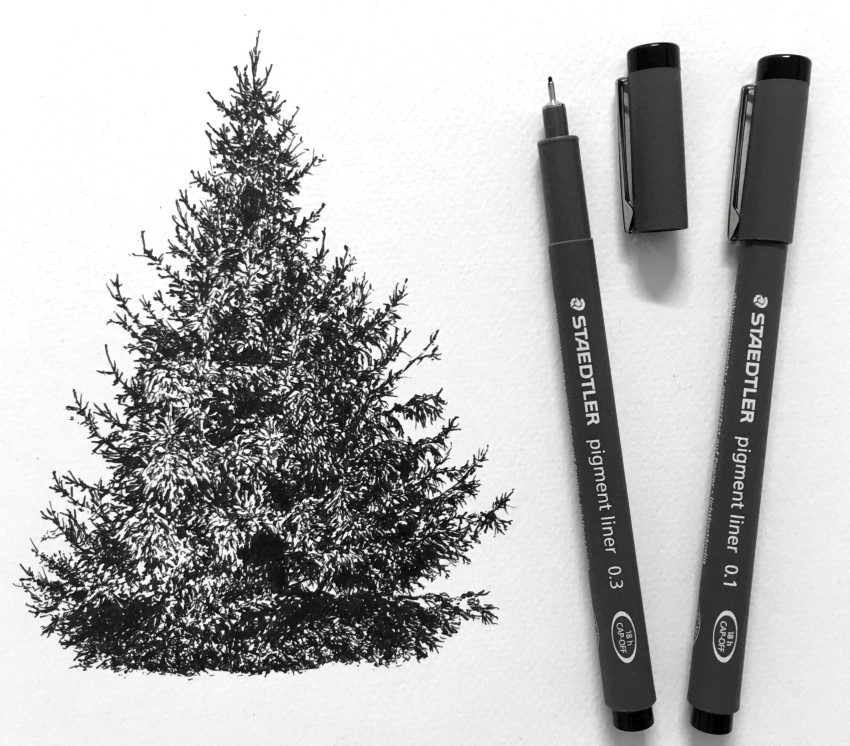
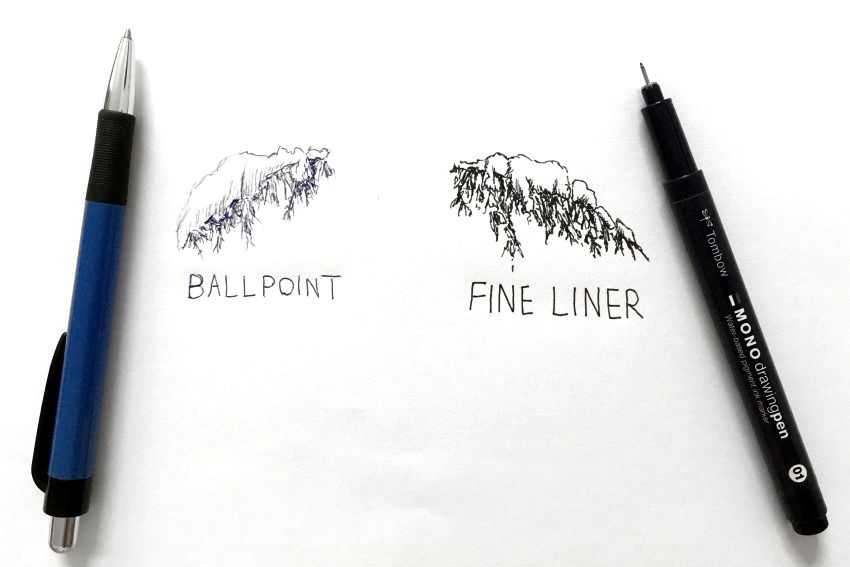
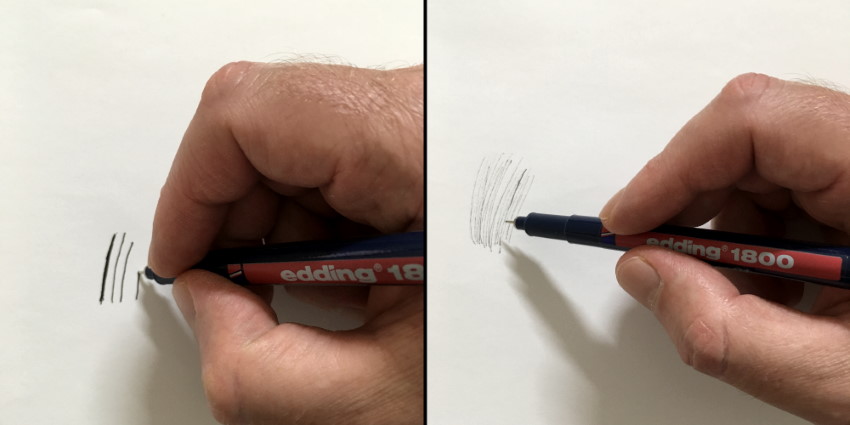
Mostly, I use a pen with bill size 0.1. Information technology is small enough to create fine details.
Photos & Contrast
When I am taking photos of a tree, I practise it from several angles.
If possible, I circle the tree to become a photo from every angle.
I select a photo that has high contrast every bit my reference epitome.
Contrast between highlights and shadows is crucial for a cartoon to stand out, and to have presence.
Not enough dissimilarity leads to a flat drawing with no depth. Besides much contrast looks cartoonish.
 Olive tree
Pine Copse
Of import:
Before diving into complex texturing and rendering, if yous are a beginner, you lot might want to practise the next step.
Depict whatsoever random tree shape, sketch some random marks to fill it up, and then draw more sketchy marks in one side and at the bottom of the tree (to create a darker value for the shadow area).
This should non take more than 5 minutes! The advanced texture you will see later this example is just a thing of many hours of practice to refine the texture marks.
Pino copse are relatively like shooting fish in a barrel to draw from imagination.
They have very minor, needle-similar leaves.
I like to start by gently drawing the form, and and then fill it with minor, random marks, that are Not in any specific direction or with reoccurring shape.
Last pace is to draw more marks for darker areas, depending on the direction of light yous choose.
Pine trees come in many types and shapes.
Looking at a reference image tin can help at the beginning, just as a guide to depict the form, and to pay attention to night and low-cal areas.
Other than that, attempt to exist loose and sketchy with your marks.
When cartoon a close-up view, yous can indicate the needle-like leaves at the edges of the tree.
 Pino tree
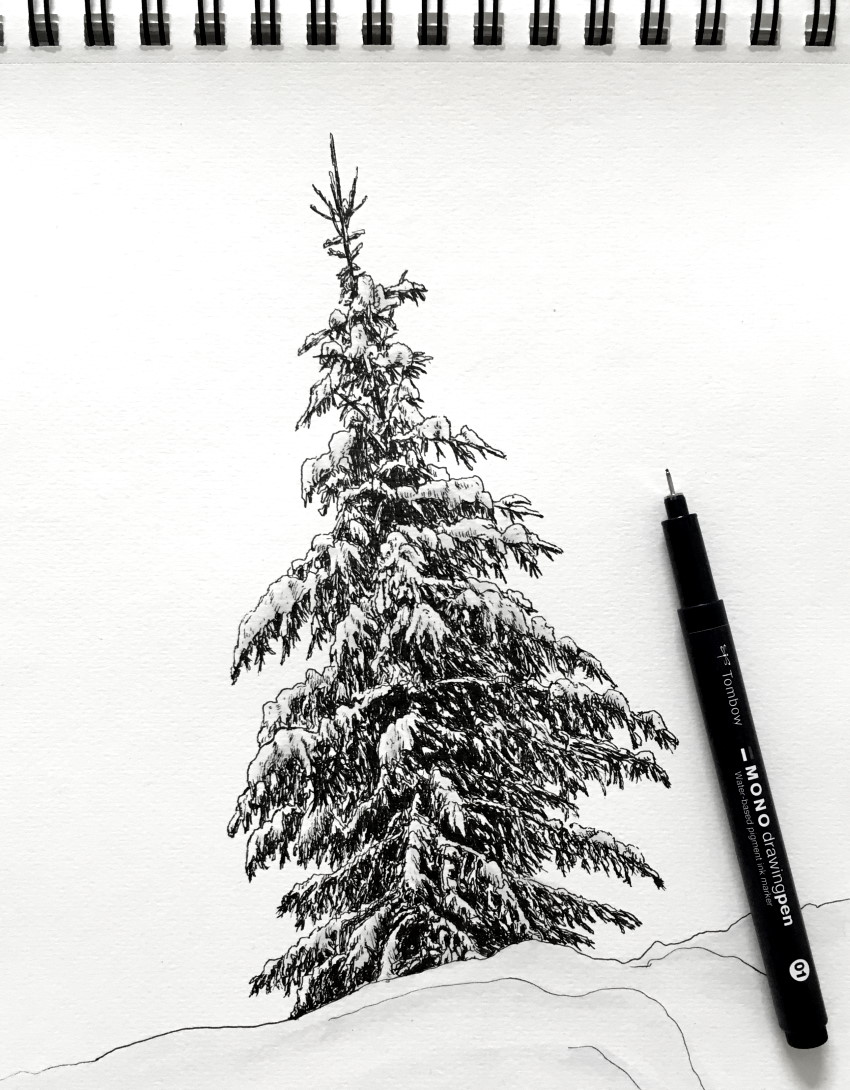
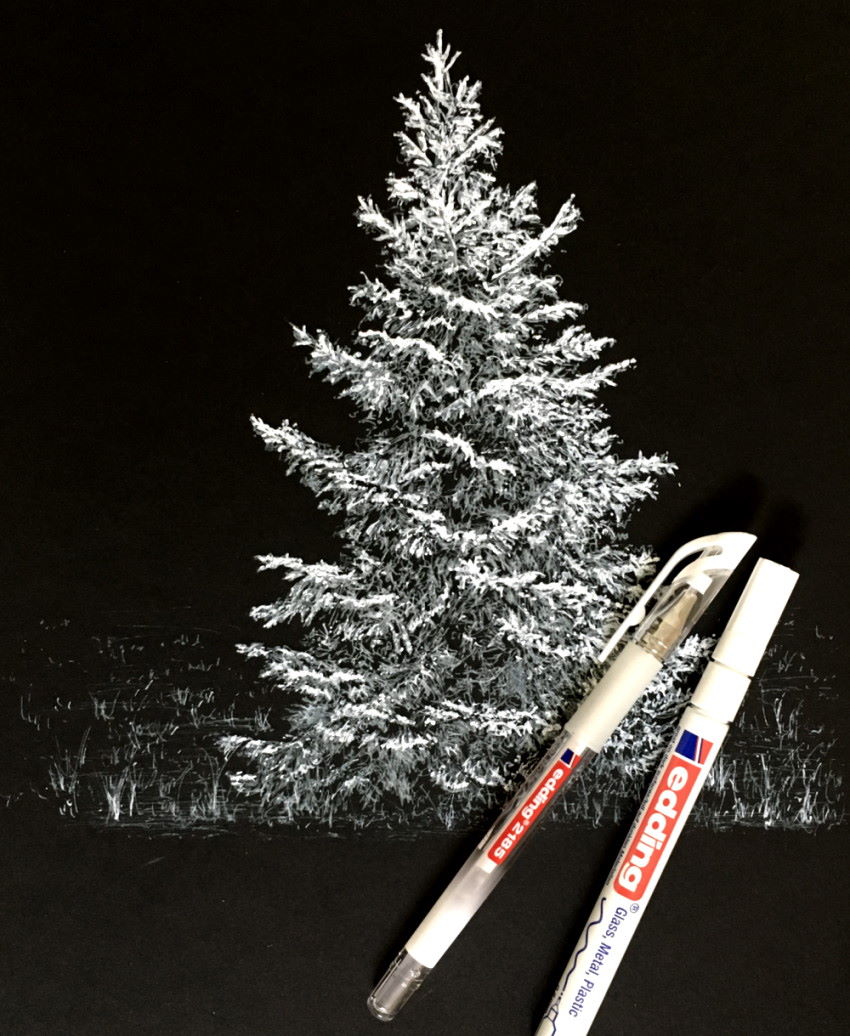
Snowy Pine Tree
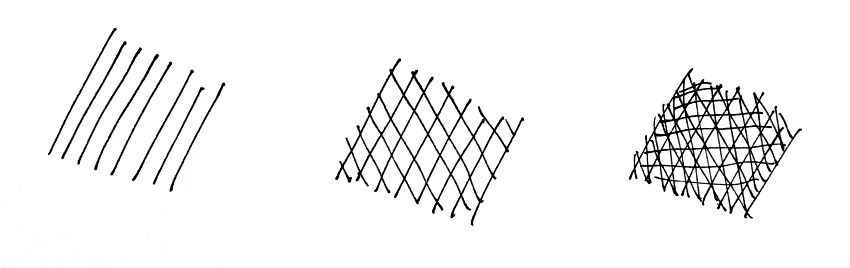
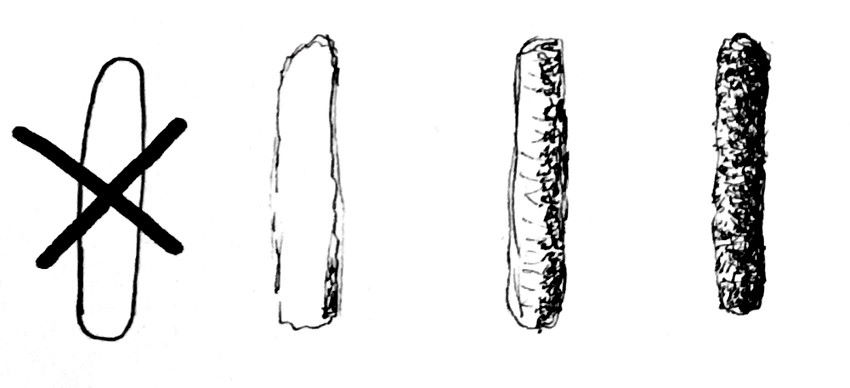
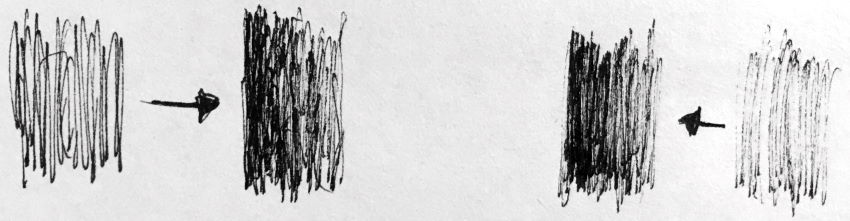
A pen has but ane brightness value. Therefore, yous take to utilize different techniques to create the illusion of transitions in brightness values.
I technique (or fashion) is to use hatching. Hatching means drawing parallel lines.
By drawing lines with different caste of spacing betwixt them (or with different line width), you lot tin can create an illusion of different brightness values.
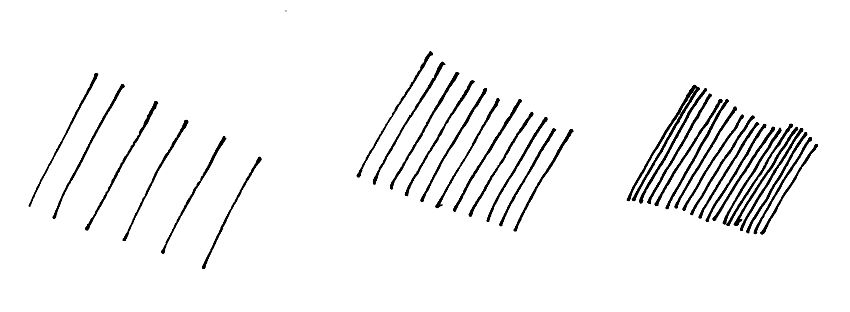
Another method is to use cross-hatching.
Cantankerous-hatching ways drawing sets of parallel lines in dissimilar management. Past adding more sets of cross-hatching, yous can create the illusion of darker values.
You can use ANY pen for drawing. I adopt artist-grade technical pens (too fineliners). They create lines with fixed width, and their ink is made of pigments, which is very durable and lightfast.
For the snow part, you can leave it empty ("white"), or you can utilize hatching in some areas.
In this example, I used some hatching, and some marks with very low-cal greyness marker.
 Snowy Pino tree
If you lot want to know more almost markers, visit my markers review for artists.
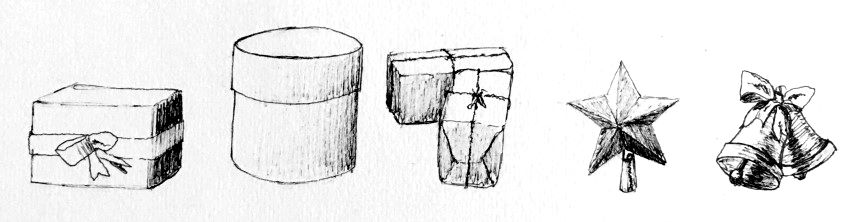
Christmas Tree
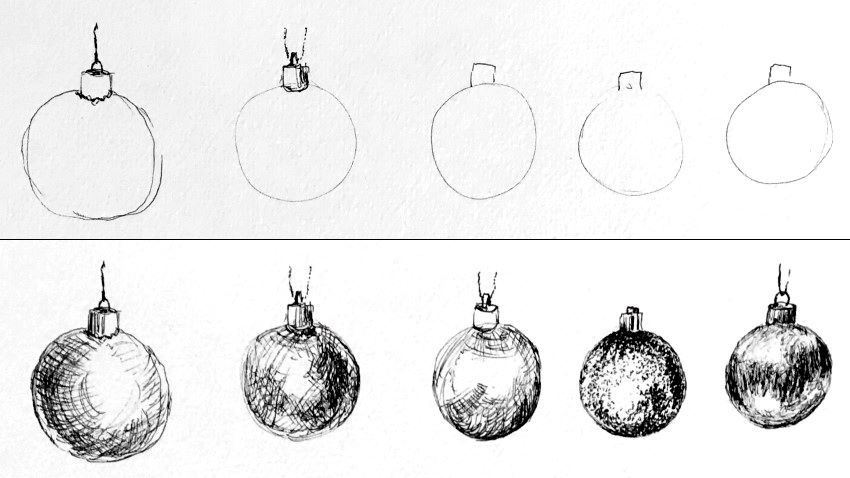
A Christmas tree is just another pine tree, just with decorations.
To add together some baubles, showtime draw their shape, and so try unlike types of hatching, cross-hatching, and stippling.
Stippling is a drawing technique that uses dots. The more dots you add in 1 area, the darker it looks.
You lot can add other decorations to your Christmas tree.
It is best to kickoff sketch some exam drawings on a dissimilar newspaper, to run across what works, before adding them to your drawing.
To add boxes in perspective, you should be familiar with linear perspective drawing, and learn to describe from imagination.
Tip:
If you discover it hard to draw a tree with a pen, you can e'er offset with a pencil.
When you reach a satisfying issue, you can go over it with a pen, and gently erase the pencil marks.
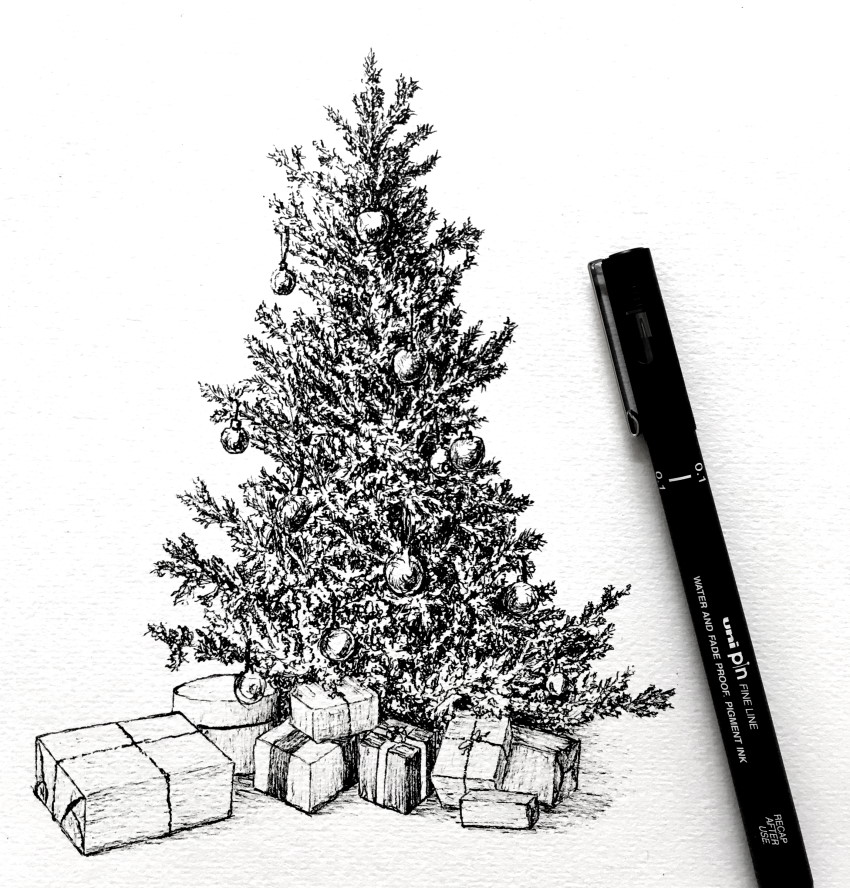 Christmas tree
Cartoon with White Pens
When drawing with white pens, pay attending to the same drawing fundamentals.
While with black pens y'all describe more than lines for darker areas, with white pens you should depict more lines for light/bright areas.
These pens are nearly effective on black (or dark) paper, and for highlights.
Go on in heed:
White pens are designed for covering.
Drawing with a black pen (which has ink) over white areas (made by a white pen), may ruin the pen's nib, because it will be covered with the white substance (therefore its ink will not flow smoothly).
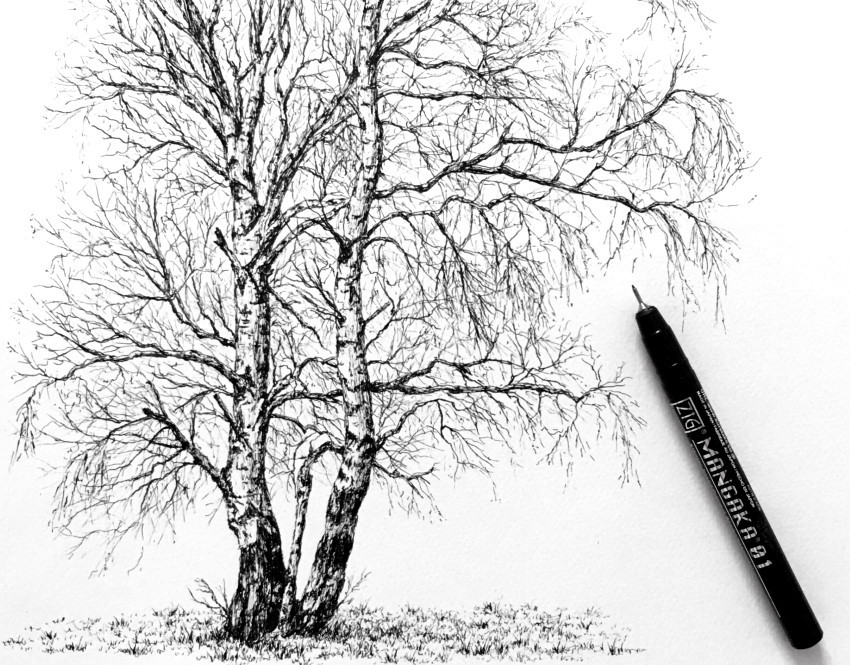
Aspen & Birch Trees
Aspen & birch tree trunks are easy to describe when doing it in steps.
Draw the form kickoff:
And so, add together some basic details:
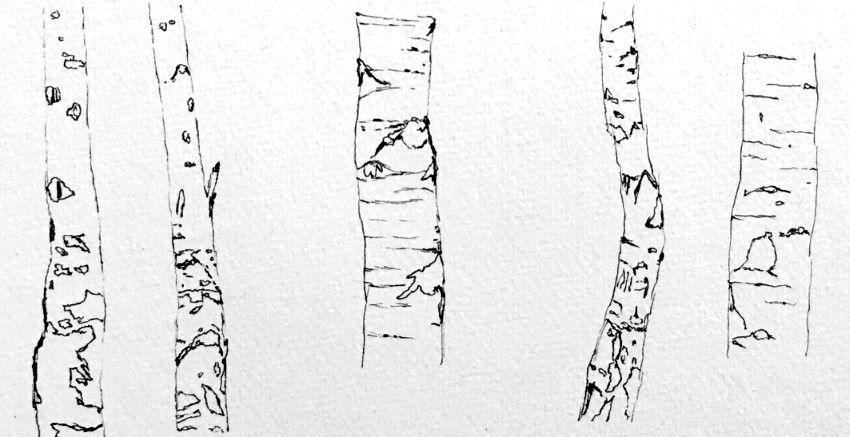
Finally, draw some effulgence values, and texture:
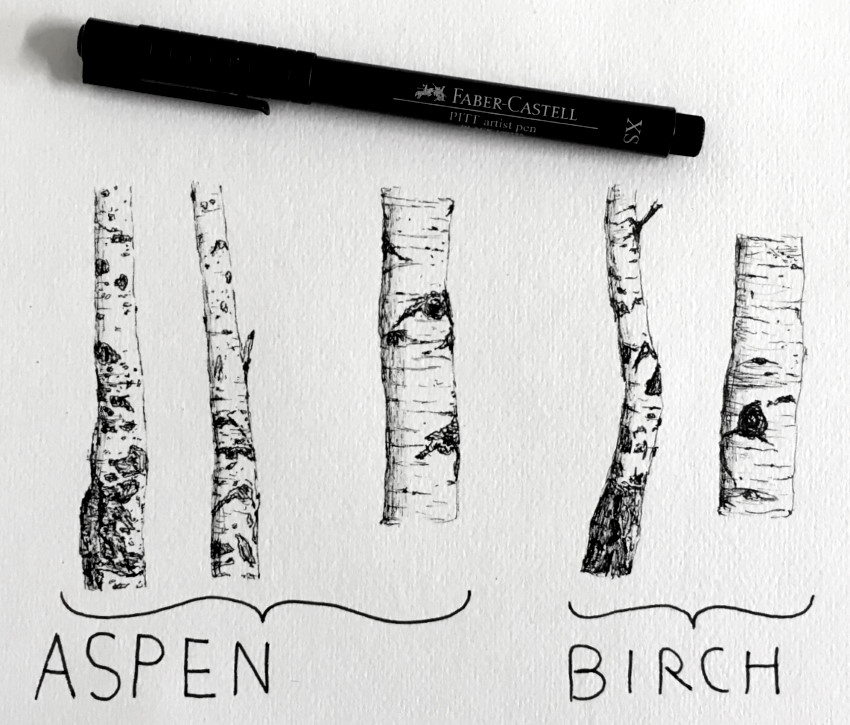 Birch & aspen tree trunks
You can apply (low-cal) grayness markers for coloring:

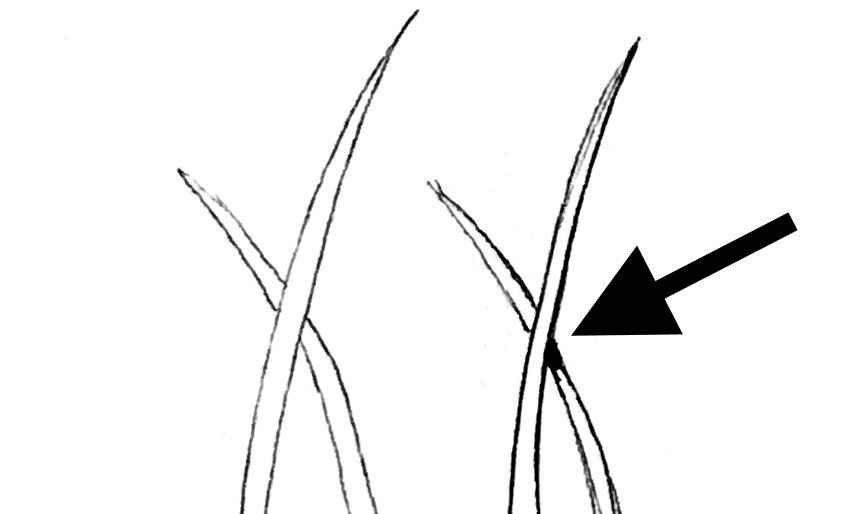
Overlapping
Overlapping means an object that partially covers another object.
When you lot run across an object that overlaps another object, y'all assume that this object is in front of the object it covers.
Overlapping is one of the nigh powerful ways to create the illusion of depth on a flat newspaper.
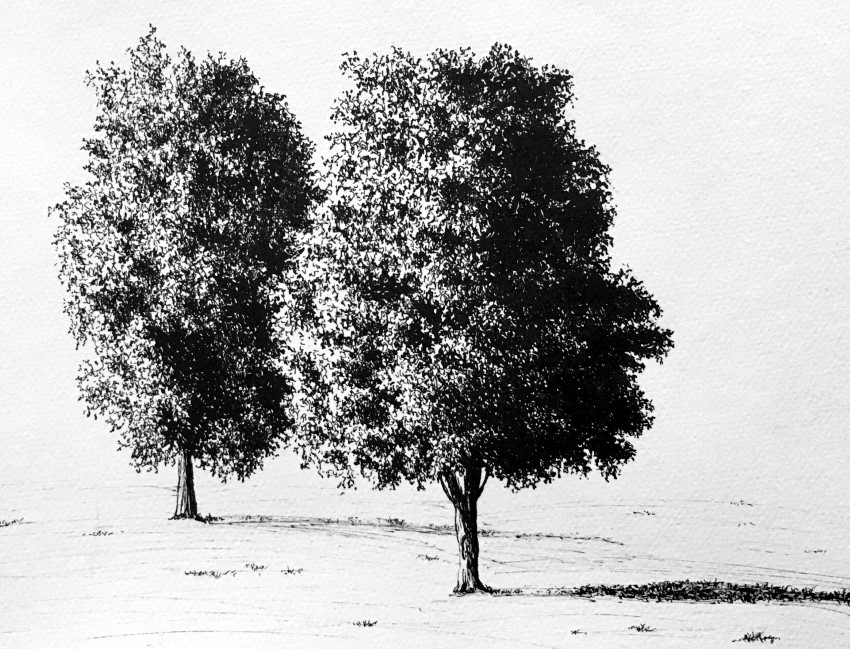 Overlapping trees
Because you cannot erase pen marks, information technology is best to depict foreground objects commencement!
If yous want to draw a house in forepart of a tree, draw the house first:
Exercise the aforementioned for tree branches.
First, describe the co-operative that overlaps a tree, and so the tree trunk.

For copse that take a complex structure, with many branches, you tin apply a pencil to draw the basic shapes.
When you are happy with the consequence, y'all can draw over it with a pen, and gently erase the pencil marks.
 Birch copse
Transitions
Transitions are part of drawing (and painting) fundamentals. They be everywhere!
For example, unlike areas of a flat plane have dissimilar relationships with any light source, reflections, and shadows.
Therefore, always look for transitions (in brightness values) for your drawing to await realistic and natural.

First, look for light and dark areas.
And then, await for transitions inside each area. Transitions from night to light, from light to lighter, and from dark to darker.
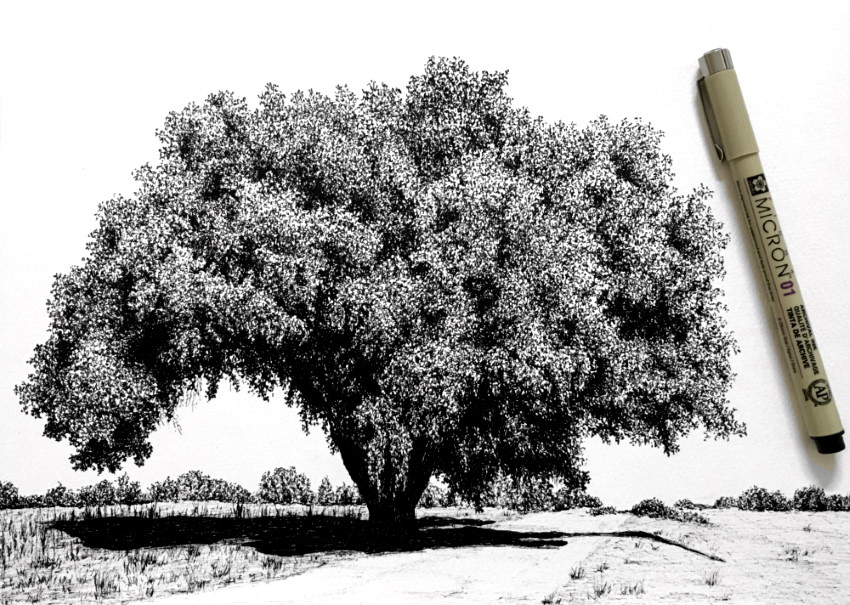 Oak tree
By drawing with NO transitions (and using hard edges), you tin create something that looks unnatural, equally opposed to something realistic with transitions.
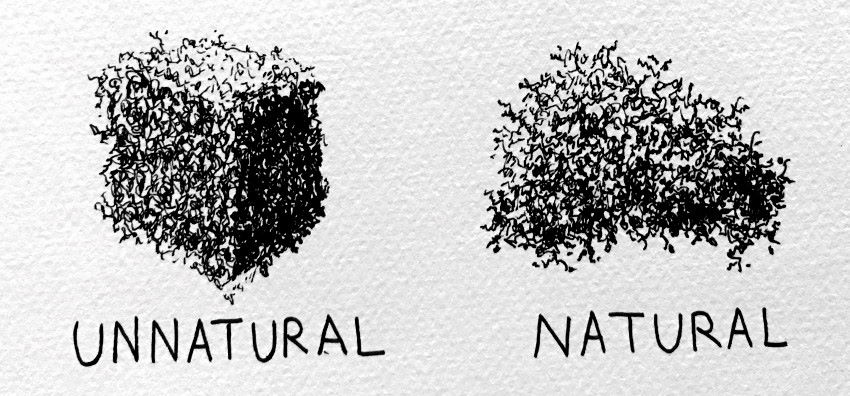
The same way a gardener trims bushes and copse, you can utilise your artistic license to create something that looks artificial or man-made:
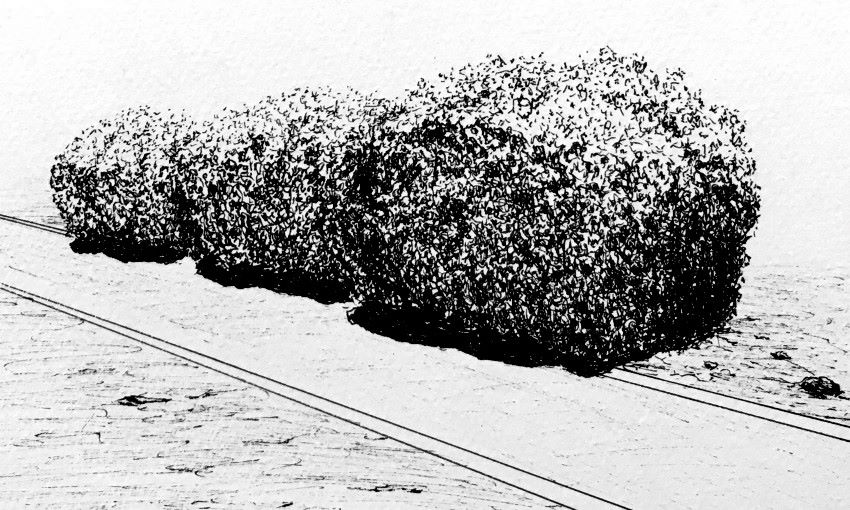
Artistic license ways to use your knowledge and experience.
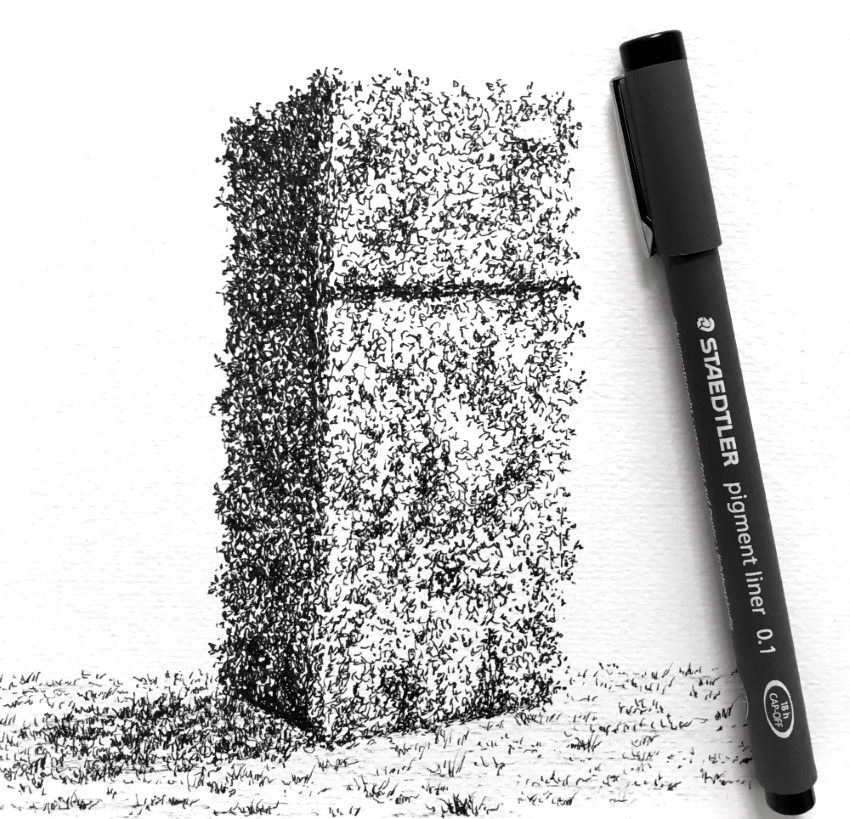
Once y'all understand how to depict leaves, you tin describe anything with leaves texture. Objects, figures, vehicles, or fifty-fifty a fridge:
Skilful to know:
Transitions are non limited to brightness values. Transitions exist in colors, texture, edges, and temperature (transition from warm colors to cool colors).
If y'all are struggling with realistic drawing, you might desire to read my realistic pencil-cartoon guide. Information technology covers the 4 important fundamentals (accurateness of the form, brightness values, edges, and transitions).
Weeping Willow
A weeping willow tree is a flake tricky to draw.
Its leaves are like shooting fish in a barrel to draw at an upwards-close expect. As you go farther away, you tin can see long clusters of leaves with no single leafage shape.
You tin beginning by cartoon an outline for the tree structure. Do it gently.
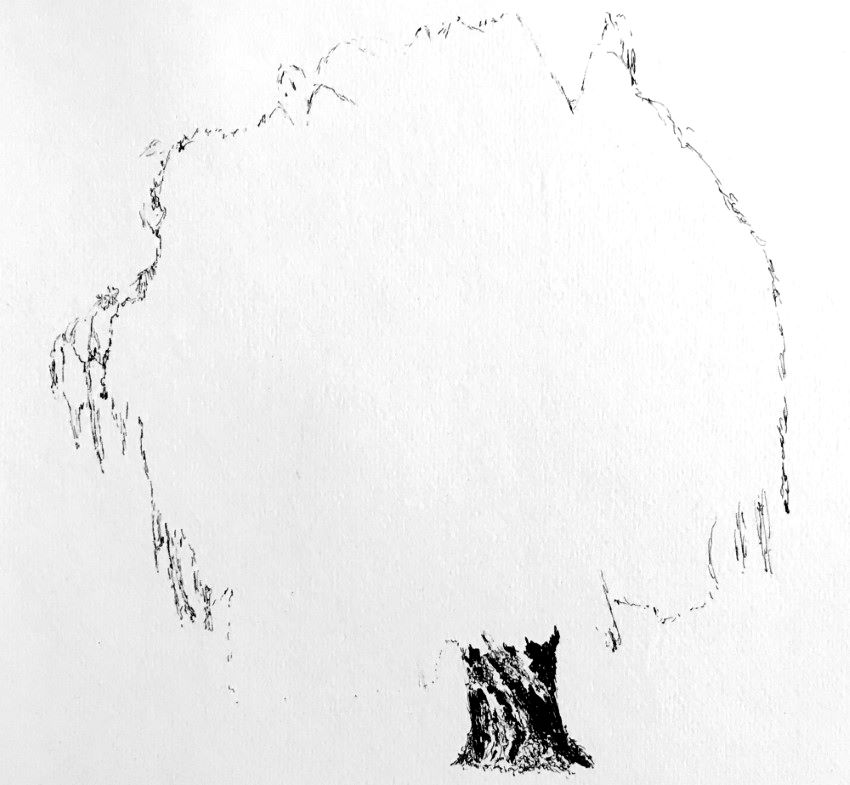
Then, one way is to draw the treetop (crown), section past section.
Alternatively, similar in this example, you can draw the dark values first.
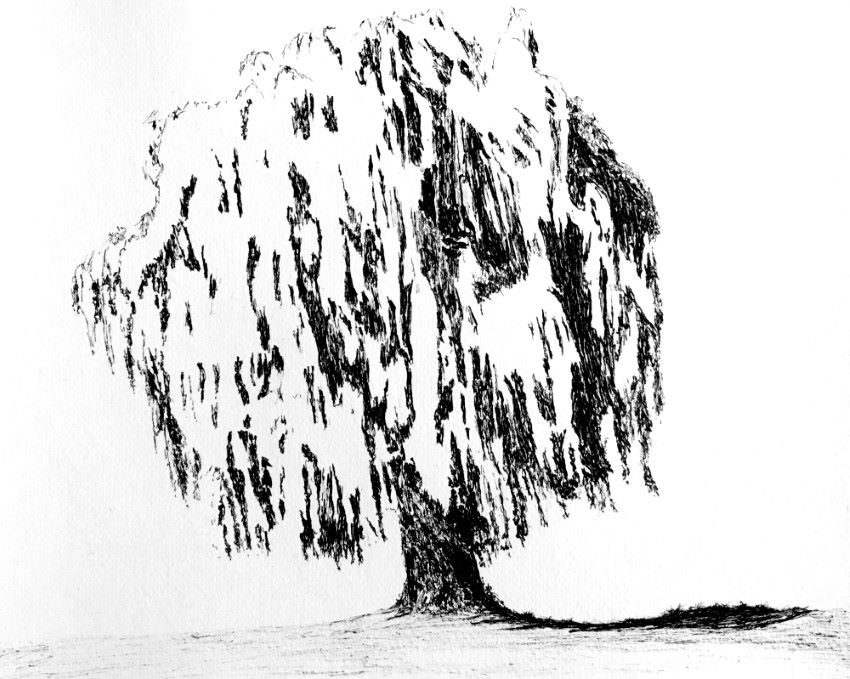
Something to consider:
Every bit mentioned above, a pen has ane brightness value (commonly black, though other colors exist, more than on that later on).
By cartoon gently and swiftly, with a sharp angle, you can produce lines that are less defined, and therefore with a lighter value.
The last step is to add the lite values.
Pay attention to brightness values, transitions, and texture. Be abstract with your marks, yet with a sense of direction.
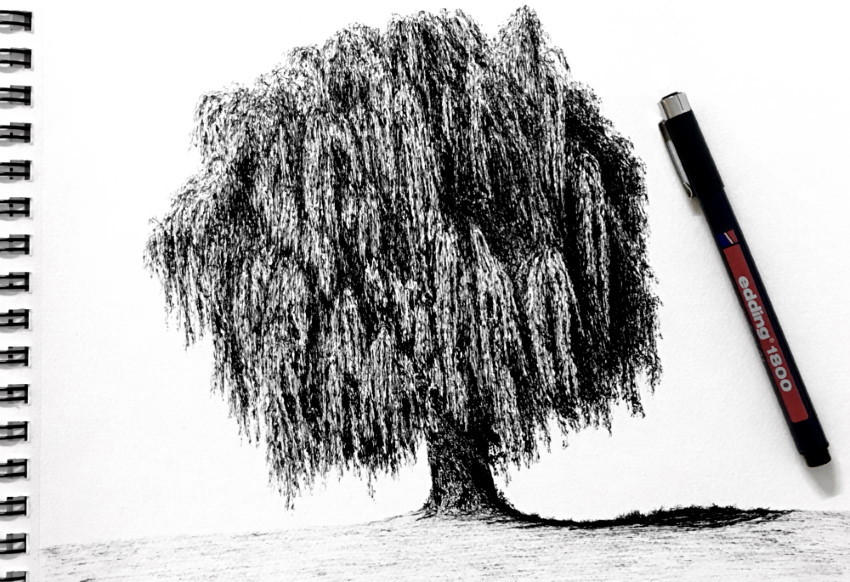 Weeping Willow
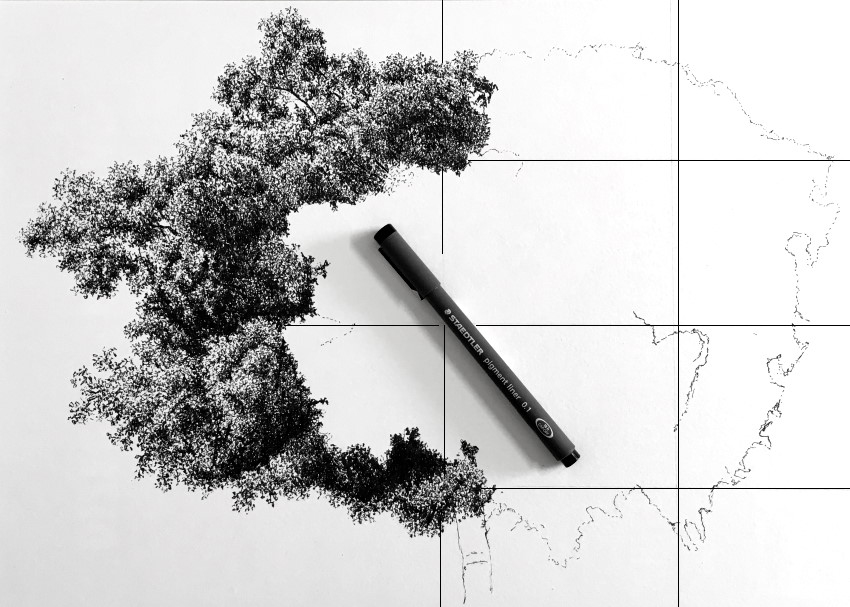
How to Draw Huge Trees
For some large trees, like Ficus, I like to utilize a large newspaper canvass (A3 in this case).
If the tree is too circuitous to describe, you can draw a grid (softly with a pencil), to split up the newspaper into smaller sections (and employ the aforementioned grid for your reference image).
Keep in mind:
Drawing on a large newspaper with a pen (or a pencil) is fourth dimension-consuming. For a tree like this, it can easily take more than xx hours to complete.
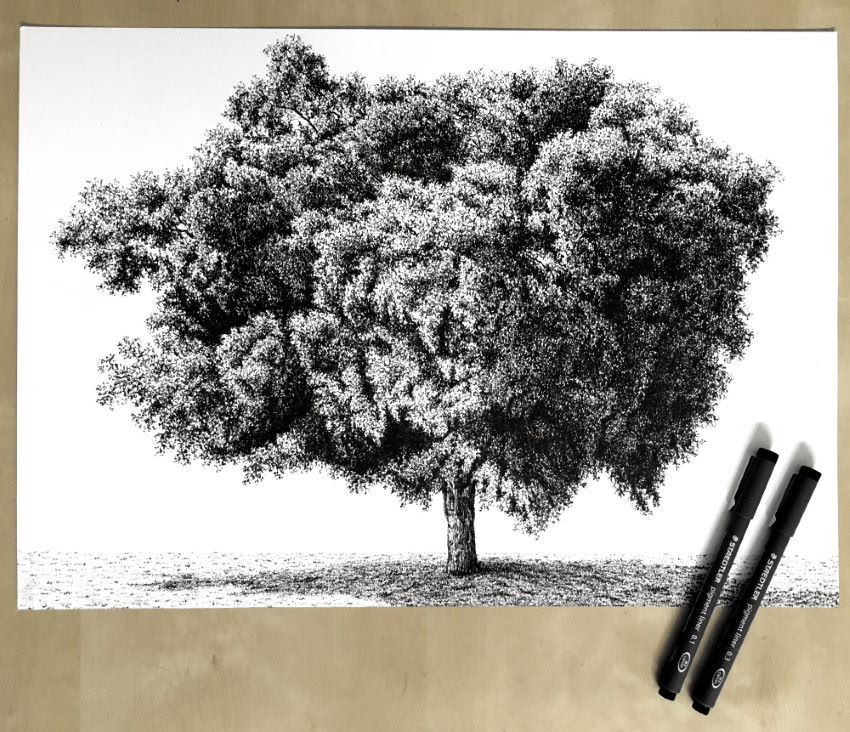 Ficus tree
Sometimes, huge drawings may not look so large on a small-scale screen.
Y'all can give it context by adding background trees (from imagination in this case).
 Background drawing
Something to consider:
You should use the rules of atmospheric perspective when drawing backgrounds (landscape).
When objects are far away, there are more temper particles (that scatter low-cal) between them and the observer.
For far away objects, use less contrast and fewer details. In addition, background layers become lighter, and have soft edges.
Adding Background
Trees are beautiful on their own. Sometimes though, you may want to add a background.
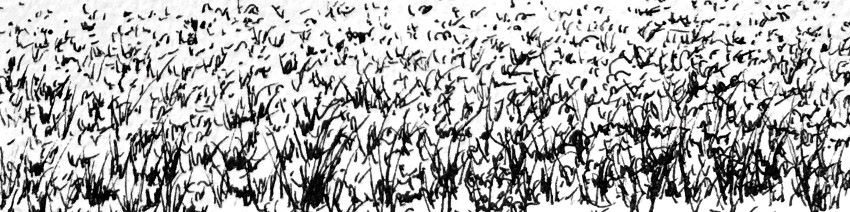
Cartoon grass is a elementary and piece of cake solution for background.
Start by cartoon some short lines. The lines in the front should be a bit bolder and longer.

Add more lines; some can exist longer (more often than not in the foreground).
Avoid any pattern, and try to be abstract with your marks.
With a tree (eucalyptus in this case), grass (every bit groundwork) adds depth.
There is no actual depth in a drawing, your paper canvass is apartment. The higher you depict on your paper (until the horizon), the further away it looks.
By cartoon bandage shadow by the tree, you can add a sense of infinite to your drawing.
To depict bandage shadow, add more marks (lines) for that area, to create the illusion of nighttime value.

Calculation Plants
Some other choice is to add some plants. For example, cattail plant (Typha).
Remember:
Natural plants and copse accept an abstract shape. Brand sure you do not describe them besides round and uniform.
When drawing long leaves, pay attention to cast shadows:
After test-cartoon the plant'southward parts, describe some loose outlines.
For realistic results, draw each flower or leaf with different size, shape, and direction (but, keep in mind the tree or plant characteristics).
Additionally, pay attending to overlapping.

Then, add together some brightness values and cast shadows.
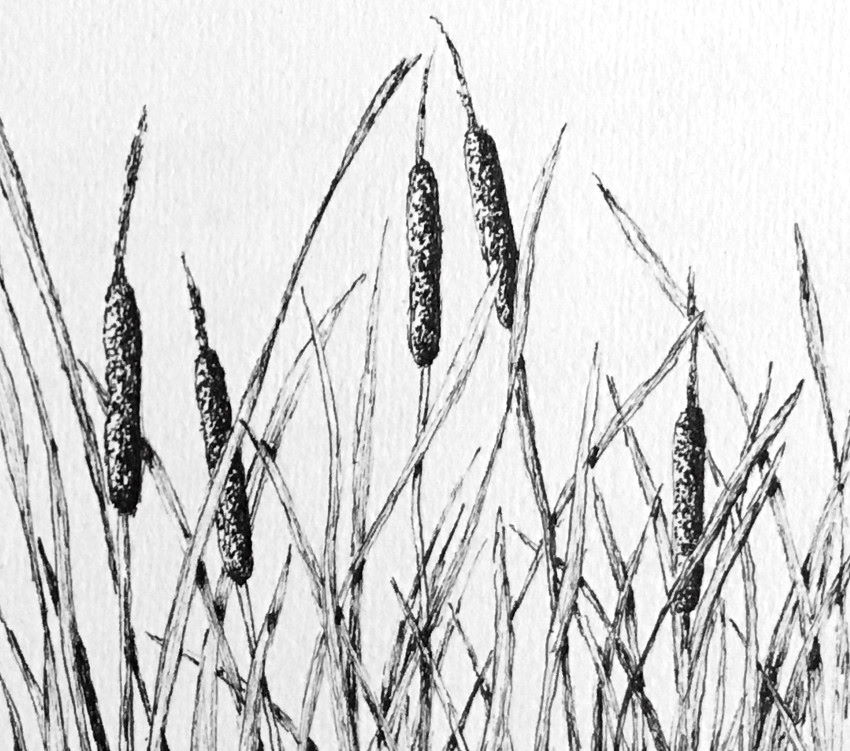 Cattail
Now you can combine grass and plants to depict a landscape.
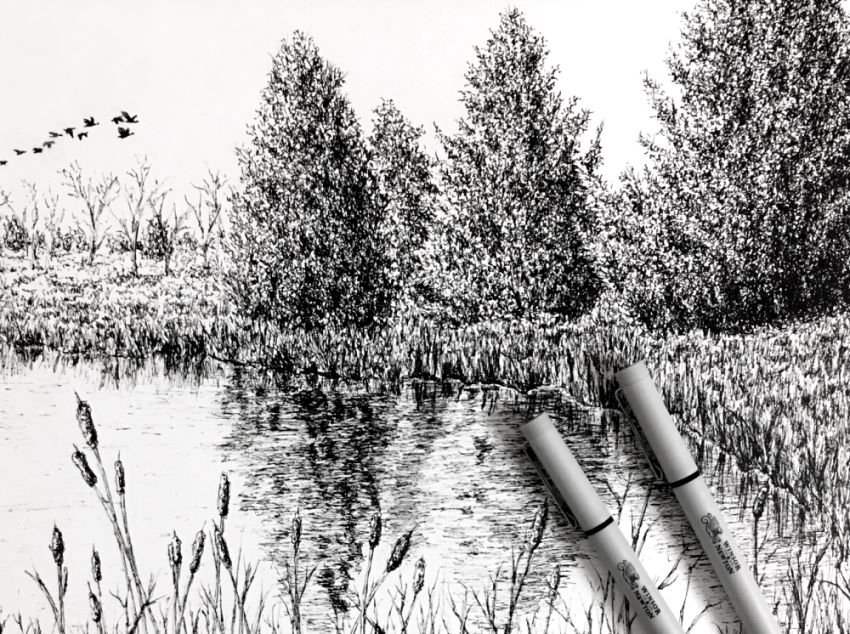 Landscape pen drawing
And, paint information technology with markers.
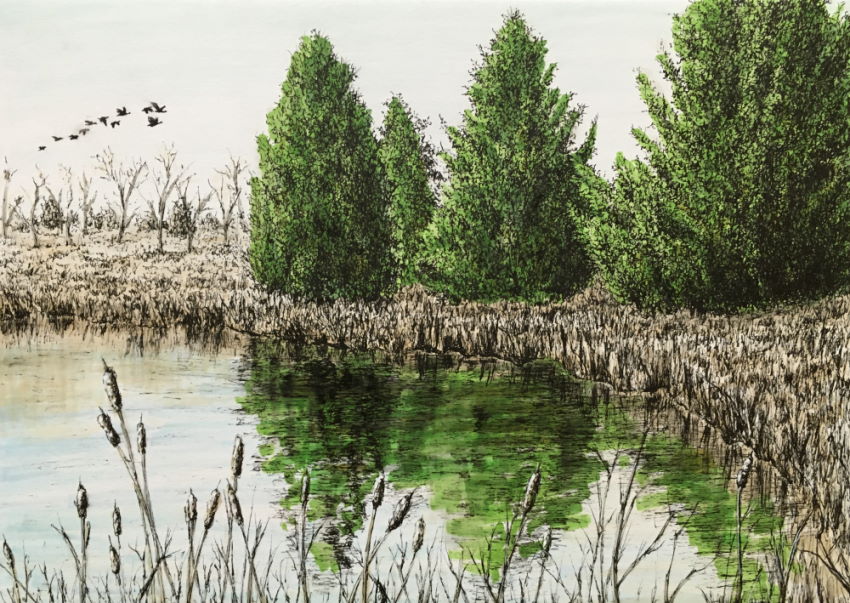 Coloring with markers
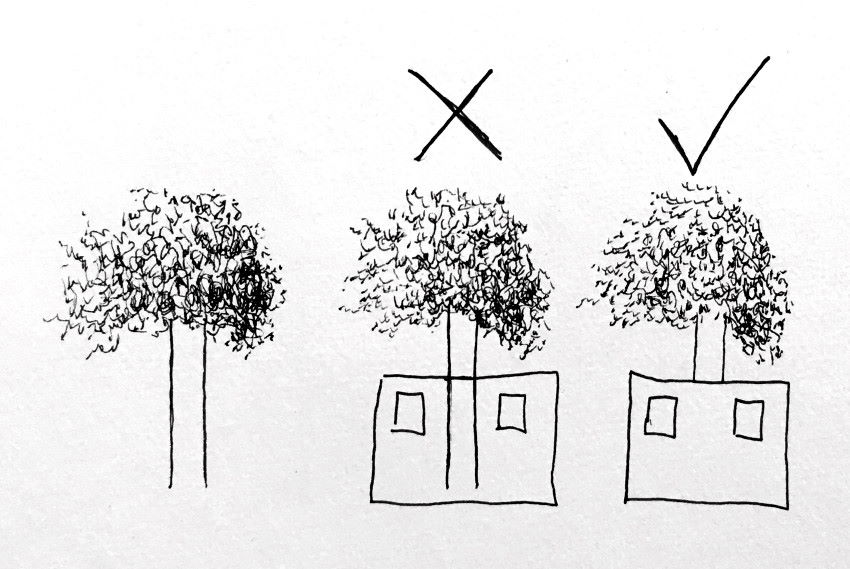
Size & Context
The style to define the size of objects is by placing them nigh other familiar objects.
Although a worm is usually quite small, by drawing it large compared to known objects like trees, it is possible to create a giant monstrous worm.
 Behemothic worm
On the other mitt, you might want to depict a small-scale tree, like a bonsai tree.
In this case, you need context.
Drawing a tree in a institute pot can assist, just sometimes even large copse are sold within pots.
Drawing familiar surroundings, like a room, can help a lot in defining the bonsai'due south size.
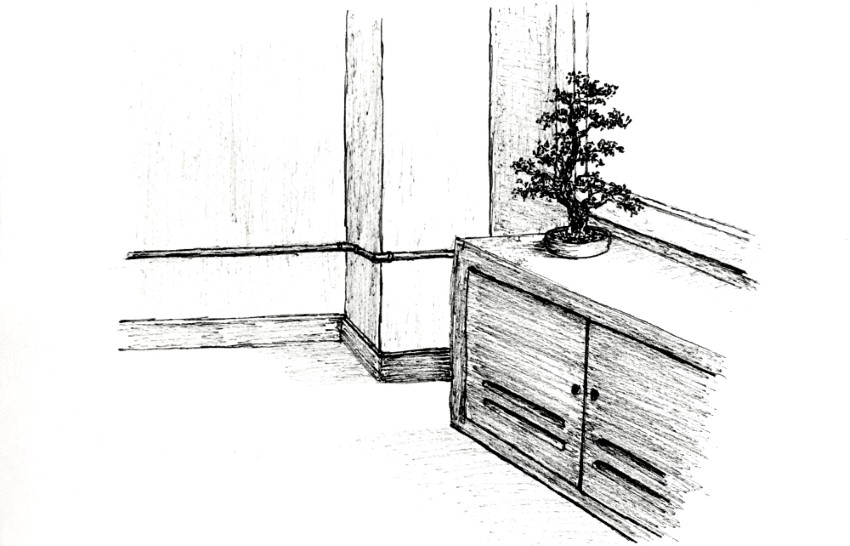 Bonsai tree
Colored Pens
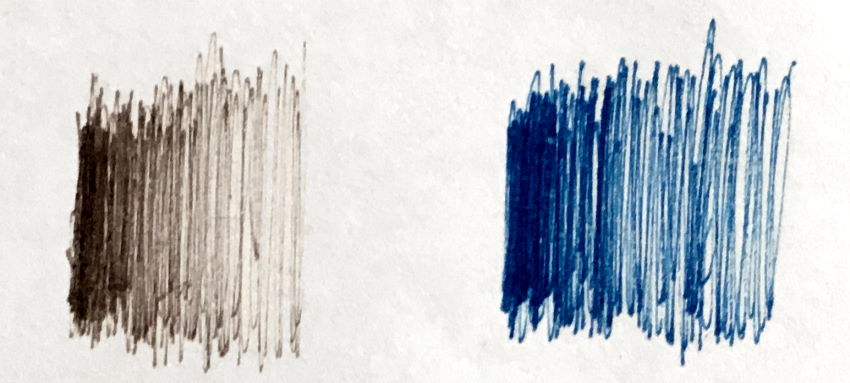
While the main color for technical pens is black, many brands offering other color options.
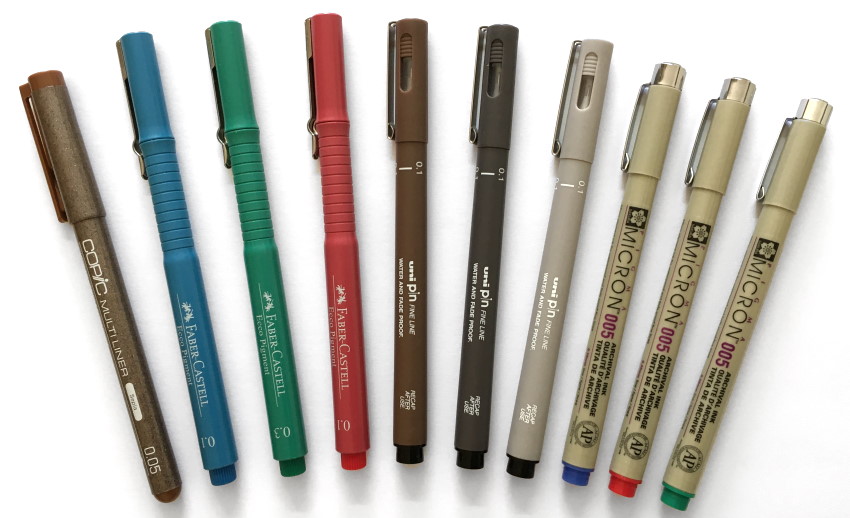 Colored technical pens
I prefer black ink, but occasionally I like to mix it upwards with colors.
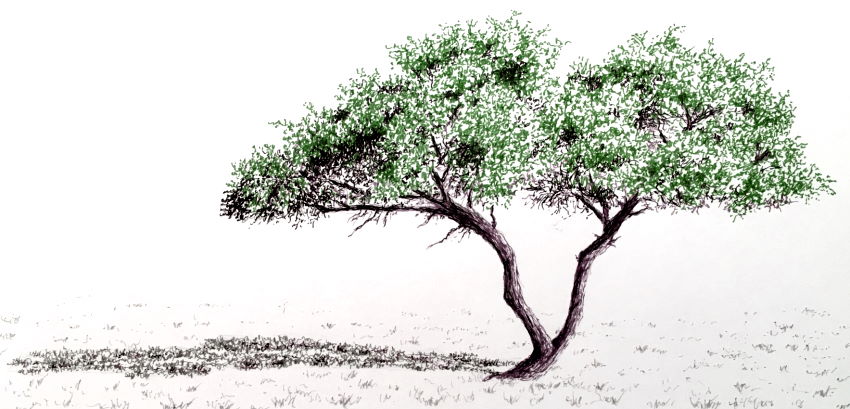 Acacia tree
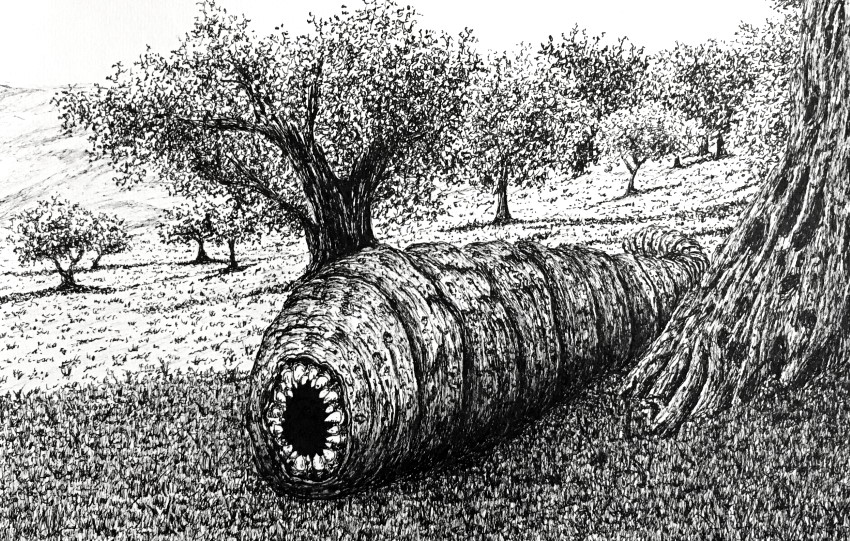
Log
To draw logs, timber, or tree trunks, offset by drawing the outlines gently.
Pay attention to foreshortening, and add some basic details.
Lastly, decide where to place the lite source, and draw a gradual transition in brightness values with sketchy marks.
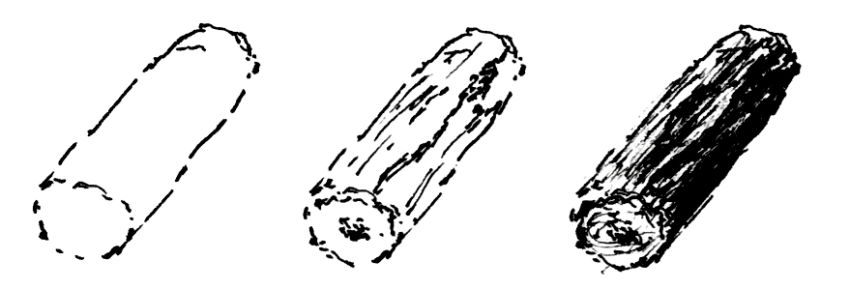
Transitions:
A cylindrical object has a transition in brightness values, from night to light.
When using a black pen, depict more lines for darker areas.
Some other option is to draw less divers lines (swiftly at an angle), and add more than lines for darker values.
Colored pens:
Different blackness pens, colored pens come up in different levels of opacity.
When drawing more in the aforementioned area, the pen creates a darkness value. Sometimes y'all can allow the pen ink dry, then draw over information technology once more.
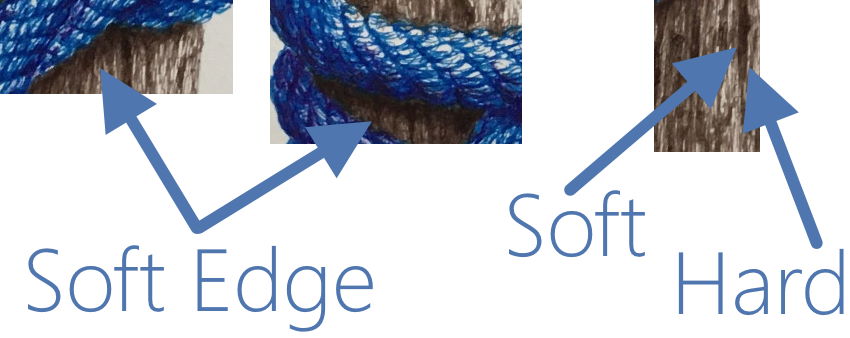
Edges:
Cast shadows usually have soft edges (see below how the cast shadow from the rope has a soft edge).
When you scribble the wood texture, you want to take some dents and holes in some areas.
Draw these dents with a hard edge on their darker function, and a soft edge when the transition ends (the light side of the dent, or pigsty).
For a more than realistic rendering, with more than details, draw big.
Summary
While there are no lines in nature, pens tin only create lines!
Drawing is creating an illusion. The world is three-dimensional, but your paper-sail is two-dimensional.
To create this illusion, pay attending to brightness values, edges, and transitions (amongst other things).
A pen has only one brightness value, so, unlike other drawing mediums (graphite, charcoal, pastel...), you have to create the illusion of different brightness values and transitions (in brightness values).
When drawing copse, focus on accuracy of the form, and on brightness values.
Make sure you have plenty dissimilarity betwixt highlights and shadows, for the drawing to exist noticeable.
After yous master drawing the form and brightness values, details (texture) make all the difference.
If y'all liked this article, you might like my flower pen-drawing guide too.
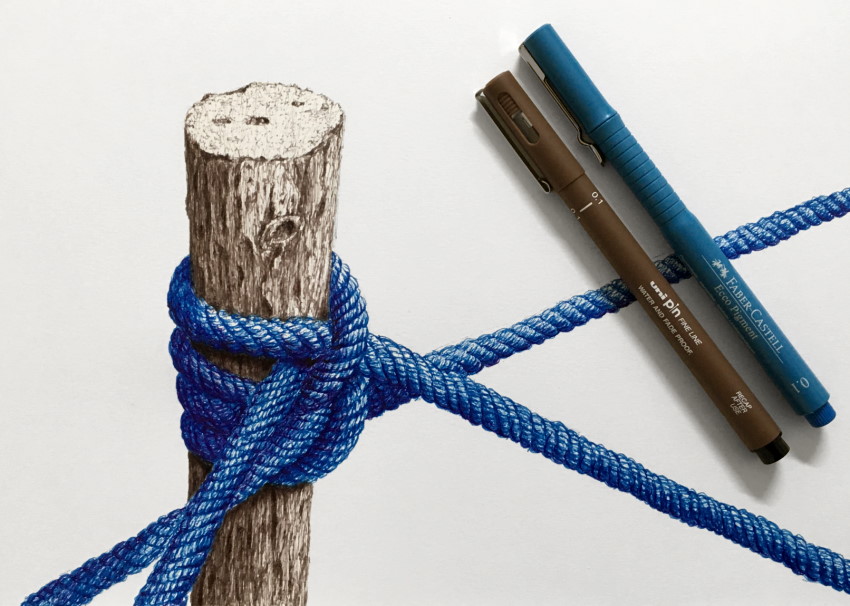
For my recommended pens that I used in this guide, visit my review for fineliners and technical pens for cartoon.
![]()
![]()
Copyright © RanArtBlog.com. All Rights Reserved. | Sitemap

Source: https://ranartblog.com/blogarticle10.html
Posted by: cookshiled.blogspot.com
0 Response to "How To Draw And Paint A Realistic Moose"
Post a Comment